
LED Lights Review
Winter is just around the corner, so let’s take a look at some of the new model LED lights that have just hit the market.
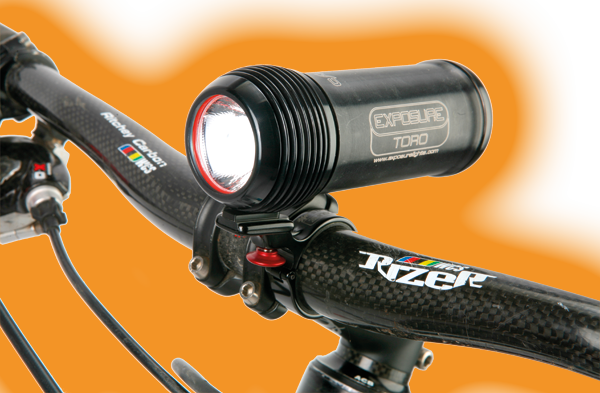
Bike Box (03) 9555 5800 / www.exposurelights.com
For 2010 UK lighting specialist Exposure has redesigned their second-tier light; the all-new Toro replaces their ‘Enduro’ model, while the Maxx-D (with a claimed 960 lumens) remains as their top-end offering.
The three LED format of the Enduro has been ditched in favour of a single Seoul P7 emitter. While the claimed lumen output has gone from 720 down to 700, I feel that the Toro beam is better suited to handlebar mounted applications. Exposure claims a ‘tighter beam pattern for high speed racing’ and to me that suggests a real spot beam that punches a long way down the trail. I guess it is all relative and this may be a tight beam pattern for Exposure, but I found it to be quite diffused relative to other P7 equipped LED lights.
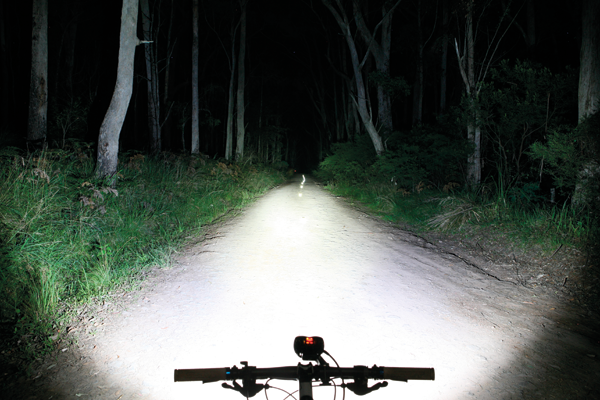
While it has a reasonable distance throw, it lacks the circular hot spot in the middle and filters away smoothly around the fringe of the beam. I would attribute this to the diffuser that is mounted immediately in front of the emitter. A smooth and flat beam such as this may not look as ‘punchy’ as one with a super bright central spot, but it is easier on the eyes and doesn’t become distracting when steering through the singletrack—an important point on what is a handlebar-only light system.
The claim of 700 lumens seems to be a fair reflection on the light output and I’d say that the available light has been used very well. It puts out a healthy amount of light that would suffice as a stand-alone light for off-road excursions. Complement it with a good helmet light like their new 700 lumen/100g ‘Diablo’ and you’ll be nailing technical sections in the dark.
As always, good light output is only half the story with the Exposure brand. They built their reputation on building lightweight self-contained lights with no wires or external batteries to worry about. At 264g the entire light system weighs less than the battery on most other lights. The build quality is also very impressive, with a nice machined alloy body and sturdy mounting hardware. I have owned an Exposure light in the past and would happily pay a little extra for the convenience that they offer. Light mounting takes a matter of seconds and you are out the door; there’s no fiddling with wires or trying to mount battery packs to uncooperative frame designs. This ease of use means I’m more likely to get out on my bike. I’ll also take it with me when I go on holidays, just in case the opportunity for a night ride arises and it always doubles as a high-powered torch.
Run times stand at 3hours on high, 10 hours on the still bright medium mode and 24 hours on the rather dim low beam. The slow 12 hour recharge time may bug some, but you can always buy one of their plug-in ‘piggy back’ batteries if you need extended run times for 24 hour racing. Overall this is another good offering from Exposure and the $555 price tag makes the Toro more affordable as well.

Exposure: Not the brightest beam but the even pattern and the way it filters out smoothly to the sides make it a very effective light.
-----------------------------------------------------------------------------------------------------

Nitelights www.nitelights.com.au
Based on the ‘Magishine’ light that comes out of China, the manufacturer claims 900 lumen of light output; 900 lumens for $199—it’s no wonder there has been a lot of talk about these lights.
Interestingly, the Magishine unit can be purchased via international mail order for around $50 less, however there are differences. The locally distributed unit has been upgraded with more secure plugs, an improved handlebar mount and the body itself is alloy (some Magishine models are plastic). The charger is a faster 2amp unit and the Nitelights charger has been approved by Australian Standards, so it shouldn’t burn your house down! Around $12,000 was spent to get the standards testing done.
The unit itself is a clear copy of the Lupine Tesla, using a single P7 emitter with a large reflector. The battery is surprisingly small and housed in a simple nylon bag with a built in Velcro wrap for mounting under your stem or on the frame. Bike mounting is easy and tool free, although the o-rings used on the handlebar mount are rather soft and stretchy—this makes fitting easy but the head unit doesn’t feel all that solid on the bars. It never slipped in riding but it could move if you bumped it whilst touching the rear mounted mode button. I wound up using the smaller o-ring on my oversized 31.8mm bars to get a tighter fit and while this helped, it still wasn’t as snug as the Lupine version that the light is copied from. For $199 you also get a simple but effective helmet mount and extension lead.
While the light is really bright and capable of mixing it with lights costing more than double the price, there’s no way it compares with a true 900 lumen light. I would say that it is closer to 700 lumens. This is still plenty for most off-road riding but their claims are clearly exaggerated. The beam is quite white in colour with a medium width throw and a slight hot spot in the middle. It gives good distance vision but the central hot spot combines with the distinct cut-off around the edge to make it a little distracting in tight singletrack if handlebar mounted. Helmet mounted is a better bet if singletrack is your thing.
The biggest fault lies in accessing the different modes. A single button cycles through as follows; high/low/flashing/off/high. So, if you are climbing on low beam and come across an unexpected descent, you first have to go through an annoying flashing mode before undertaking the flat-out dangerous task of switching it off before you can get to the brightest setting. If attempted at speed on a technical trail, there’s a fair chance that you’ll be using the high beam to collect your teeth after impacting that tree whilst in the ‘off mode’! My advice would be stick it on high beam and leave it there. You’ll get 3.5 hours that way and if you need more burn-time, stop the bike and change modes whilst stationary.
Yes it has clear faults, but for $199 will anybody really care? I’d say a large number of riders would overlook these issues. It gives those on a tight budget access to seriously bright off-road lighting, and for $400 you could even get two and have around 1,400 lumens split between your handlebar and helmet. These things are going to sell like hotcakes!

Nitelights: The sharp cut-off around the edge makes this light more at home on fire roads rather than twisting singletrack.
------------------------------------------------------------------------------------------------------

HID Technologies 0432 922 603 / www.hidtechnologies.com.au
Last year when we reviewed the original version of the Pygmy we were shocked that such a tiny light could pump out so much light. It weighed just 75g with a claimed output of 600 lumens. Now, less than 12 months down the track, the new MAX version is said to offer almost double the output from the same minimalist head unit. It’s a good example of how quickly LED technology is advancing. The good news for owners of the original Pygmy is that the light is upgradeable and you can get the new LEDs fitted.
Now the Pygmy is said to produce 1,000 lumens on high beam. Looking back at the beam photos from last year, it is clear that the new version is brighter. Whether it is 400 lumens brighter is hard to say but there’s no doubt it packs more punch. It also has a slightly smoother beam pattern. Rather than having a narrow focused spot, the beam has a relatively wide central bright area, around which the beam intensity drops right off to the sides. It’s somewhere between a spot and a truly smooth and filtered broad beam.
This beam works best as a helmet light for singletrack riding and the mounting hardware is geared in that direction too. Weighing just 75g, you won’t notice it on your head and the alloy bracket attaches through the helmet vents with a single Velcro strap. It is simple, offers sufficient tilt for beam adjustment and keeps a low profile on your head.
With so much light from a tiny head unit, heat build up is always something to watch for. HID Technologies say that it is thermally protected against overheating, and while the unit gets hot, the heavily finned body has a large surface area for heat dispersion.
A handlebar mount is available but it is a relatively clunky add-on that looks like an afterthought, although it does allow for easy swapping between helmet and bar mounting if you need it. If you do plan on handlebar mounting the light, it is also worth noting that the neoprene and Velcro wrap could have been more secure if it had a buckle to leverage off when tightening. Ignore these criticisms if you want it as a dedicated helmet light, and I feel that is where the Pygmy works best.
The mode button is large, light and easy to press; so easy that care needs to be taken to avoid accidental activation. Always unplug the battery when putting it in your bag or you may start a fire! In use the light-action button makes it easy to swap between low, medium and high beams, even while wearing winter gloves.
In our original look at the Pygmy we found that the coil style power cable was a heavy duty unit that would tug on your helmet if the length was too short. This has been swapped for a nice fine cable that won’t intrude or restrict your freedom to move on the bike. The wire connectors are also new and have small knurled metal lockrings for added security. These worked fine but don’t over tighten them as they’ll be hard to get undone—especially in cold weather.
With around 1,000 lumens and a healthy 4-hour burn time on high, the Pygmy is an impressive little unit. It is also very well priced for such a powerful light.

HID: Not the most even beam pattern but an impressive amount of light for such a tiny unit.
------------------------------------------------------------------------------------------------------

NiteFlux (08) 8463 1382 / www.niteflux.com
The Enduro 12 features a familiar form but with brand new internals. Externally the NiteFlux units haven’t changed since the good ol’ days of halogen candlepower. You still get a thickly built alloy light head and the battery cells are housed within an alloy stick.
This ‘classic’ design has both good and bad points attached. The clunky head unit may make it a little weighty on your head but the abundance of alloy provides a great heat-sink for high powered LEDs. Additionally, you could pretty much run it over with your car and expect it to survive! Again, the battery may be heavy but it is also robust and far less prone to impact damage that those using a rubberised shrink-wrap or a neoprene wrap—the benefits here are worth considering as Li-ion cells can catch fire after an impact. Other safety features include a heat sensor within the light head that winds back the power if things get too hot.
Another thing that remains unchanged is the mounting hardware. The light head swaps easily between the handlebar and helmet mounts, plus the light can be mounted directly to the stick style battery to form an ultra-powerful torch. When bike mounted, the battery fits into a nylon bracket that goes under your drink bottle—right where your mini pump would normally go. This may be inconvenient for some bike setups but NiteFlux supplies a double mounting bracket so the pump can go in one side and the battery in the other, or you can mount an extra battery if longer run times are required. The handlebar brackets are some of the easiest to use in the business. They allow fast, tool free mounting, adapt easily between different handlebar diameters and also offer side-to-side adjustment for different handlebar sweeps.
LED technology has come along in leaps and bounds, and NiteFlux has moved with it, taking on the latest LED emitters as they hit the market. The new Enduro 12 is the latest in this progression. The tight cluster of three mini LEDs is driven at 12-watts to produce a very serious output. NiteFlux claims 1,000 lumens and it certainly looks to be up that way to me. The beam colour is very white which seems to create more contrast and more discernable shadows on the trail, although it can get a bit glary in dusty or misty conditions. While it is very bright in the middle, it filters away ever so smoothly to the sides with no real cut-off in the pattern. It works equally well for both helmet and handlebar mounting.
Out of the box it has five outputs of varying intensity. This is overkill and you forget which mode you are in half the time. Thankfully this can be tailored to your needs with modes deleted as required; I found that a simple two mode high-low setup worked well for most off-road use. The low beam is definitely required, as you will only get a little over 2-hours on the 12-watt high beam setting.
When compared with some new offerings, the Enduro 12 is a rather chunky and slightly overweight setup. However, it wins in terms of robustness, safety features and the light output is hard to fault. It is also competitively priced for a quality light set.

NiteFlux: A good all-round beam pattern with plenty of punch.
-------------------------------------------------------------------------------------------------------

Distributed by Radical Lights (02) 8006 2991 / www.radical-lights.com
Last year we reviewed the first generation Podda 4 light from small Wagga based brand, Radical Lighting. Twelve months down the track and we are looking at the Podda 4 Mk2. While the new version follows a similar overall format, it has been refined and improved somewhat.
Most of the change centres on the machined alloy head unit. The four CREE LEDs have been updated, as have the electronics. The result is a claimed 18% increase in efficiency (the run is supposed to be around 30 minutes longer), and the output has gone from 1,137 lumens up to 1,259. Improved temperature monitoring should extend the life of the LEDs and the alloy head unit features new machining for better heat dispersion. It also happens to be a few grams lighter—the 2009 model was 140g with the carbon helmet mount where this year’s sample was 119g. Handlebar mounting has been made more secure with a new thumbwheel bracket (it previously used an o-ring mounting system that was a little awkward to use and not as secure, so this is a marked improvement in my mind). Finally, the new kit is equipped with a more compact intelligent charger.
This light has five different power levels. Most units with this many modes become confusing; the variations in output can be so subtle that you can’t tell what mode you are in. To some extent this still applies but the rather intuitive mode button makes all the difference. Rather than going through a standard sequence (high/medium/low/high for example), a quick push of the button takes you to a brighter beam and a one-second hold of the button drops the beam down. It means that you don’t need to cycle through unwanted dim modes if you all of a sudden need maximum light. Switching the light on requires three presses of the mode button in quick succession, which should make accidental start-ups very unlikely.
While the new handlebar mount is great, the simplistic helmet mount may not be for everyone. It consists of a carbon fibre plate that mounts through the helmet vents with a Velcro strap. There is no tilt adjustment and you have to aim the beam by moving the entire light unit to a different location of the helmet. The advantages of this simplistic design include low weight, low mounting position that is less prone to tree snagging and general reliability—no moving parts makes it pretty bombproof. With a little trial and error, most will find a suitable position and then mount the light in the same spot every time. However, this design may be annoying if you like to fiddle with the aim of your helmet light when you are riding. In its defence, the beam is that broad and powerful that precise aiming of the light becomes far less important because the light just goes everywhere.
This unit does appear more powerful than its already bright predecessor. We tested the ‘intermediate’ beam and it floods the trail with a very even and smooth beam pattern. There are no lines, hotspots or aberrations; nothing at all to compromise your perception of the trail. In most brands this would be called a wide beam, but with over a 1,000 lumens at its disposal, it still manages to provide a really good distance throw—you’d need to be going pretty damn fast on a fire road descent to outrun the beam on this light! The smooth, wide yet powerful beam makes it one of the nicest lights that I have tried. At $950 it is a big dollar piece of kit but the quality is obvious, and being locally made, it is also future upgradeable as LED technology marches on.

Radical: Tons of light and oh-so-smooth, offering great peripheral vision.
-------------------------------------------------------------------------------------------------------

JetBlack Products (02) 4560 1200
The Pro 1,200 is the new flagship light system from Niterider. This light incorporates two Seoul P7 emitters rated at 600 lumens each—yes, that’s 1,200 lumens in total. Each LED has a separate reflector; one is a wide beam while the other is a spot. This light could best be described as overbuilt. The rather bulky battery is housed within a protective hard case, the connectors are weatherproofed and the light head is equally robust in its construction.
While it may be solid, it is also heavy. At 600g, the battery weighs more than most complete light sets from other brands. The kit comes with a helmet mount, but the 243g head unit will be too heavy for most to handle. It is best used as a dedicated handlebar mounted light. For bike mounting, Niterider employs a multi-adjustable quick release bracket with a large thumbwheel. It allows fast, tool-free bike mounting and also works on a huge range of handlebar diameters. Like the rest of the kit, it is solid and over-engineered.
The battery clips onto a base that in turn straps to your frame. The detachable battery pack plugs into a charging station—it’s not unlike the set-up that you get with a cordless drill. Now this is where things start to get really interesting. This ‘docking station’ can also be plugged into a PC, and by downloading the Niterider software, you can completely customise the brightness levels and instantly see how it affects the run times. Some lights allow you to add or remove modes or vary the brightness of the different beam settings, but it is always done through some sequence of button pressing on the light unit itself. Niterider’s PC based system is so much easier. You can also set up different profiles for the various rides that you do; commuting with flashing modes, racing with a simple low/high arrangement, and perhaps a long burntime profile for epic night rides where you want an emergency backup option—you decide.
Beyond adjusting the brightness, you can also decide whether you want to bias the flood or the spot beam, and I found this particularly useful. While each beam pattern is nice and clean with no dark patches, the spot creates a very bright central hot-spot within the wide beam’s light pattern. This is great for screaming fast fire road descents, as the distance throw from the spot is huge. However, dive into some twisty singletrack and the spot can become an annoyance. At close range the spot forms a bright patch that can be distracting as it bounces back off the trail and the trees. If your eyes adjust to the hot-spot, the surrounding area lit by the broad beam can appear comparatively dim. The solution is to have a ‘singletrack mode’. Both beams blasting and 1,200 lumens for faster, more open trails and a secondary mode with the wide beam at full power but the spot toned back to half power to mute the hotspot in the singletrack. While you are at it, why not also add a climbing mode that removes the spot beam altogether but keeps the broad beam at full power (600 lumens) to illuminate any technical sections. It’s pretty cool stuff!
It could be argued that a dedicated 1,200 lumen wide beam would be better in the singletrack; this would flood the trail with all 1,200 lumens and no distracting hot-spot. While that may be the case, the real advantage of the Pro 1200 lies in its adaptability, and its ease of set-up. There may be lights that provide a better beam pattern for twisty singletrack, likewise a dedicated 1,200 lumen spot would rock if your riding consisted entirely of straight fire trail descents. The Pro 1200 offers a bit of everything, pumps out masses of light and should last through the next ice-age!
Niterider: A huge output with awesome distance throw, although the broad beam has a distinct cut-off around the fringe.
-----------------------------------------------------------------------------------------------------
Note: All of the night time trail photos were taken on a Canon 5D (28mm lens) with a 20 second exposure at F9 and an ISO of 400. Ten reflectors on the trail are spaced at 10 metre intervals so the furthest is 100m away from the light. These images should not be compared with our last lighting shootout as variations can occur with different print runs.


