ShockWiz - Ridden & Reviewed
We first encountered ShockWiz when the product was launched as a Kickstarter by Nigel Wade, a young West Australian mountain biker with a background in electrical engineering. He started working with suspension at uni where he was part of the University of WA Motorsport team; they had to build a car from scratch and then race it. He was in charge of electronics and the team was very successful, travelling to Germany in 2009 and placing third in the world.
As a long-time rider, it was only natural that he’d turn his attention to MTB suspension tuning. His ShockWiz Kickstarter campaign was a huge success and within 32 days he comfortably exceeded his goal of $90,000, with over 400 backers contributing to the project. In 2016 Nigel sold his idea to SRAM and ShockWiz is now manufactured at the Quarq facility in South Dakota. Nigel is now a fully-fledged SRAM employee but he still lives and rides in Perth.

With big companies like SRAM knocking on his door, Nigel has clearly come up with an appealing product, but what is ShockWiz and how does the work? The device measures what your suspension is doing; how much travel is being used, how fast it’s compressing and rebounding, whether it’s bottoming out excessively or not at all. This data can be read via a smartphone app which not only gives you stats, but also recommends tuning changes to improve your suspension performance.
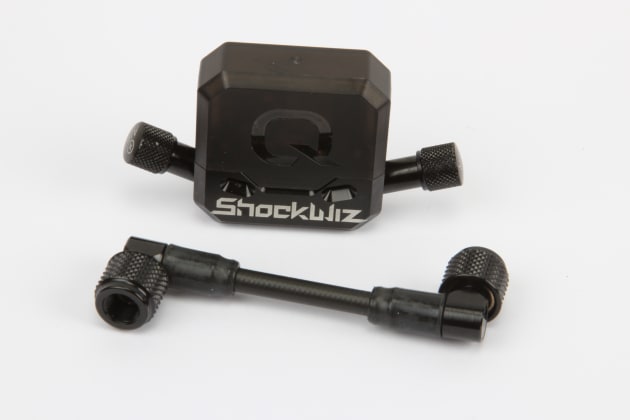
ShockWiz is powered by a small but long-lasting watch battery, weighs just 53g and measures approximately 43mm square. It mounts via two cable ties and connects to the schrader valve on your fork or rear shock via a short hose. By reading the pressure changes within the air spring, it can tell exactly where you are in the travel and records the suspension movement from there. The data is stored within the device, so you don’t need to ride with your phone. The app is simply for reading the stored data—it stays within the ShockWiz until you clear it by starting a new ‘session’.
Setup & Analysis
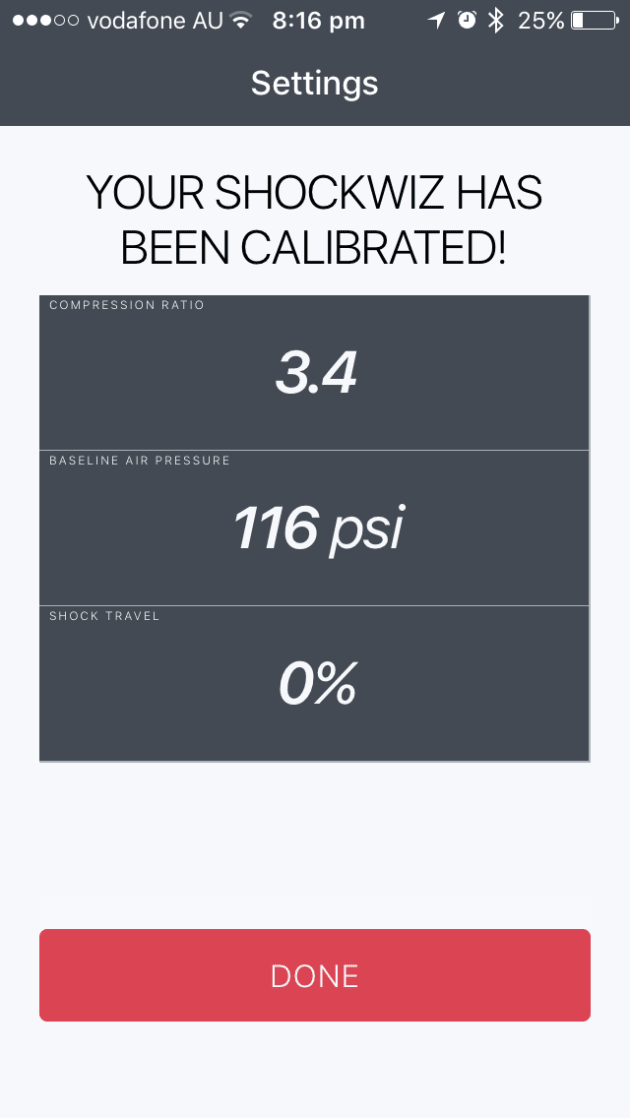
For the device to work, it first needs to be calibrated to the air spring on your shock or fork. This process is simple enough and the app gives you step-by-step instructions on what to do; letting the air out, fully extending and compressing the suspension, setting the baseline air pressure and so on. It takes around five to ten minutes and doesn’t require much in the way of suspension know-how; the app guides you through it. Once calibrated, you can take a screenshot to record your baseline air pressure and hit the trail.
As you ride, the Wiz collates the data and starts to build a picture of how your suspension is performing. For it to produce reliable suggestions, you need to ride a broad range of trails and features; climbing, drops or jumps and rooty/rocky sections. It’s important to keep any travel or damper settings consistent during the ride, otherwise you’ll blur the readings. The ‘what to ride next’ section on the home screen lets you know what’s required to complete the data collection.
Once all the data requirements have been fulfilled, the app offers a ‘tuning score’ which gives you a score out of 100 to indicate how effectively your shock is setup. In addition to this, it also offers a ‘confidence’ reading, which tells you how certain the device is of its conclusions. Don’t go changing the shock settings until the confidence is high; you may need to ride more if the device is lacking confidence.
The home screen also offers live readings of the air pressure inside the shock and the percentage of travel used at any given moment. As different people may prefer a slightly different suspension feel and have varying priorities, you can select from four tuning styles; efficient, balanced, playful or aggressive. Choose ‘efficient’ if you’re an XC racer chasing maximum pedalling speed. Go to ‘aggressive’ if you want to maximise the travel usage and plushness at the expense of pedalling efficiency. Flick between these modes and the tuning score will change accordingly.

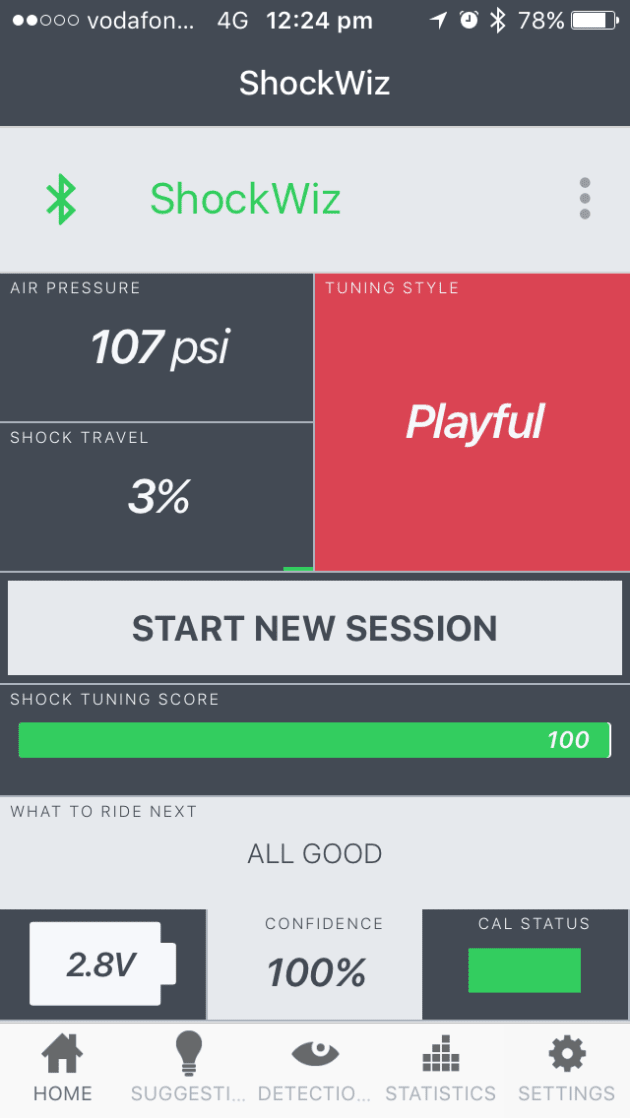
The same ride will produce different results depending on your tuning preference. Here the same damper settings scored 100% success as a 'playful' ride but a lower 92% rating for an aggressive tune.
Scroll beyond the home screen and you’ll find a ‘detections’ page where you can view analysis of things like suspension pogo, packing, bottoming, bobbing and bouncing—each gets a rating of good, poor or bad. Taping on any of these traits provides a simple definition, so the app will be quite educational for suspension tuning newbies.
Knowing the shock is performing in a particular manner is one thing but ShockWiz goes a step further by telling you how to fix any undesirable characteristics. Go to the ‘suggestions’ page and you’ll find six tuning parameters; baseline air pressure, spring ramp-up, rebound, high speed compression, low speed compression and bottom out resistance. Once again, each comes with a definition that’s displayed when you tap on the screen. Increments on a sliding scale indicate how much change is required; green is good, a yellow indicator represents a 5% air pressure change or 1-2 clicks of damper adjustment while a red indicator requires a bigger correction.

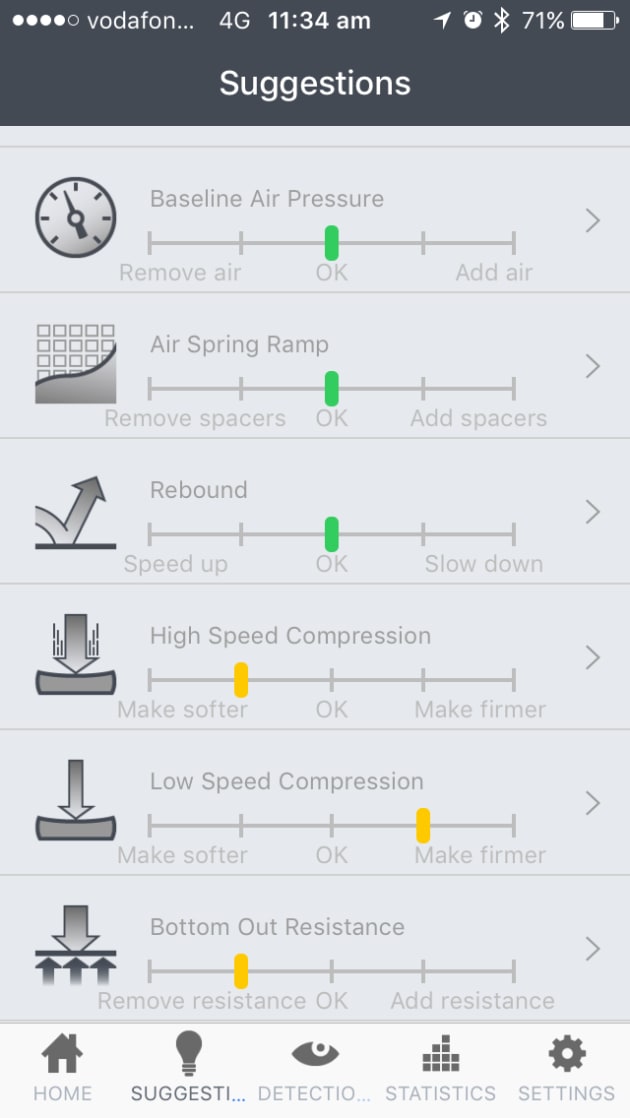
In this section, the tuning parameters are listed in priority order; start with the corrections suggested at the top of the page and work your way down. Only deviate from this order if you see a red indicator somewhere, which means one of the settings is way off. While this may be sounding like information overload, each aspect is supported with definitions and the information is right there in front of you on the phone, so it’s all quite intuitive.
The final data collection page is called ‘statistics’. It displays the number of deep compression events seen within the recording period, the average time airborne over the 20 most recent jumps (measured in milliseconds) and a dynamic sag reading. This section isn’t really meant to guide your tuning choices; it’s more of a general interest stats page.

After lowering my baseline air pressure for an 'aggressive' tune, I used more travel more frequently. The stats changed from 3 deep cycle events up to 11 on the same trail and the dynamic sag went from 21% up to 29%.
Unlike some new products, ShockWiz isn’t another solution to a non-existent problem. I’ve fielded countless questions on suspension setup over the years, so I can see a genuine need for a product such as this. Suspension tuning is very subjective topic and something that bamboozles many; some people don’t have the experience or feel to gauge whether a shock is performing adequately. Does ShockWiz hold the solution as claimed and who stands to benefit the most? We put our device to the test under a few different riders and on a number of different bikes to see if it performs as claimed.
Become a Tuning Wiz
First up, we fitted it to the rear of my wife’s bike. The shock setup has always been a bit tricky, as the bike has a very progressive leverage ratio. This makes it hard for her to utilise all of the available travel. Knowing that the O-ring rarely came close to the full travel mark, we had the shock set to be as soft and linear as we thought feasible; 30% sag when sitting, no volume reducers and the lightest compression damping available.
A quick post ride check with the app showed there were no deep compression events (that I’d expected) but the dynamic sag was just 13%—markedly different to the 30% static sag that we were shooting for. What is ‘dynamic sag’ anyway? It’s the average sag taken from the 20 most recent pedalling events. In other words, it shows where the bike sits in it’s travel while you’re actually pedalling. Why the variation? Maybe the strong anti-squat provided by the suspension linkage skewed the result, or a more likely explanation is that the dynamic figure more accurately reflects the actual sag in your true pedalling position.
Anyhow, the next move was to follow the suggested tuning changes. We had a yellow reading telling us to decrease the baseline air pressure and a suggestion to increase the low speed compression damping. There was also a yellow signal recommending that we reduce the high-speed compression, but the shock doesn’t offer this adjustment so we had to skip past that one (the Fox Float already had the lightest factory compression tune on offer).
With a 5% pressure drop and the low speed compression turned up a notch, there was a subtle change in the ride feel. She still didn’t use full travel but the bike pedalled better and was more supportive through the turns whilst still smoothing out the rough bits as required. From there the app recommended a further 5% drop in the baseline air pressure and we were starting to get there. The static sag was now at 20%, more travel was being used and the bike felt more settled on the trail—a clear improvement overall.

While that was interesting, deep down I was curious to see what the Wiz would have to say about the shock setup on my own bike. I’ve been riding the same 130/110mm travel dually for just over six months and thought that I had it pretty dialled. The static sag was set at 30% and the O-ring on the rear shock suggested that I was utilising all of the travel. I’d opted for the lightest low speed compression damping, as I was consciously seeking a plush gravity-oriented ride rather than worrying about pedalling efficiency—all legit choices in my mind.
My first outing produced a balanced ride tuning score of 92%, the only suggestion was to add a little low speed compression to lessen the pedal bob—something I wasn’t overly concerned about. However, once I flipped over to an ‘aggressive’ descent oriented tune, the ShockWiz had a quite a few recommendations.
Over the following two-to-three rides, I continued to tweak the shock according to the ShockWiz suggestions. Little by little I lowered the baseline air pressure and also added some low speed compression damping. With these changes I went from two or three deep compressions per ride to around 10. There still wasn’t any harsh bottoming; I was just using my travel more frequently and more out the suspension on the descents. At the same time, the added low speed compression improved the pedalling efficiency and helped the bike stay higher in its travel through bermed turns.
The end result is a tune that better suits my current ride preferences and the knowledge that I’m now maximising the potential of my suspension. My original settings were sound but the ShockWiz encouraged me to get creative and try a different tune. It alerted me to the fact I could get away with a softer baseline air pressure and taught me not to obsess over achieving a precise static sag figure when I’m tinkering in the garage. What really counts is the on-the-trail performance, and this device provides a worthwhile insight into what’s going on while you ride.
As a final test, I intentionally messed up the damper settings to see if the ShockWiz would notice. Sure enough it picked up on pogoing from excessively fast rebound within the first rough section of singletrack.

The standard kit is supplied with two hoses of different lengths and you can also buy a 'direct mount' version that fits straight onto the valve.
When riding somewhere new, the ShockWiz can be used to retune the shock for differing conditions and trail features. If you’re hopping on an unfamiliar bike, the device speeds the tuning process and removes the guesswork—within a couple of rides you can have everything pretty much dialled.
While I’ve found it to be a worthwhile tuning device, I see the suspension neophyte gaining even more from the ShockWiz. For someone who has little idea of where to start, the step-by-step guidance and tuning recommendations will make a huge difference. It’s educational too, as the descriptions offered within the app explain what each adjustment actually does and how it will affect the ride feel.
The main hurdle for the uptake of this product will be the price, as a single ShockWiz unit sells for $529. While it’s possible to run two units simultaneously on a dually, I’d imagine the cost will put most people off. Buy a single device and you can tune the shock first and then do the fork. Better still, split the purchase cost with some mates and share it around. Find the settings that work for you, write them down and pass the device onto your buddy—there’s no need to leave it attached once you have the suspension sorted.
Distributed by SRAM DSD & Monza Imports www.sram.com