


Riders come in all different shapes and sizes, and just like clothing, your bike needs to be the right size for you. Bike manufacturers offer anything from two up to six different frame sizes to accommodate our varying physiques, but that’s only the start; from there you need to fine-tune things so you can feel at one with your two-wheeled friend.
The three points of contact between you and the bike – namely your hands, feet and butt – need to be optimised. As you can’t stretch your limbs or change the shape of your pelvis, we’re going to give you some simple tips for making your bike fit you, rather than the other way around.
This is intended as a general guide for most mountain bikers and it should get your bike setup somewhere in the ballpark. If you have specific body anomalies, such as one leg shorter than the other, or if you’re an XC racer looking to extract maximum efficiency, you may well benefit from a professional bike fit.
Saddle Tilt
Let’s get the saddle sorted first; its height, angle, and fore-aft position all need to be adjusted. The seat angle is generally easiest; with the bike on flat ground, the best starting point is to have the top of your saddle horizontal.
If you do a lot of climbing and very little seated descending you might want to drop the nose a few degrees. Conversely, if you mostly (or only) ride steep downhills, you can try lifting the nose 10 or 15-degrees.
These adjustments will place the saddle closer to horizontal when you’re most likely to put your butt on it, but be very cautious about going too far from your starting point. Wild seat angles usually end up causing damage to delicate parts of your body. In particular, trail riders should generally avoid nose-up saddle positions, which tend to put pressure on the nerves and blood vessels in your perineum and can lead to loss of blood flow and numbness (or intense pain) in your nether regions—definitely not cool.
With long-travel trail bikes, you may also need account for your suspension setup. Perhaps you run 30% sag on the rear but the fork sits at just 15% when seated. In this instance, angling the nose down will result in a level saddle when you’re actually on the bike and pedalling. With many modern trail bikes running dropper posts, the saddle position becomes irrelevant when descending as it’ll be right out of the way.
While on the topic of saddles, bear in mind that everyone has a slightly different shaped pelvis. Depending on your specific proportions a particular width or shape of saddle will suit you best. There are quite a lot of good saddle fitting systems on the market now, and many bike stores have demo saddles that you can try out before you fork out any coin for a perch that may or may not work for you.
Saddle Height
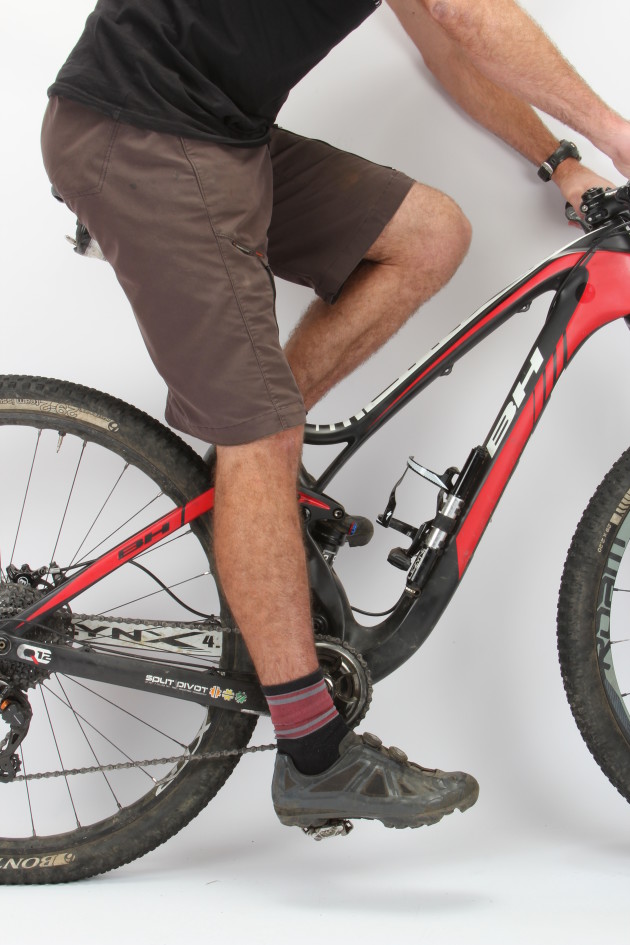
The optimum height for efficient seated pedalling is when your legs extend to about 85-90% at the bottom of your pedal stroke. If the saddle is lower than this, your quads and hip flexors will get unnecessarily brutalised. Going too high can lead to knee problems (due to repeated hyperextension) or lower back problems (caused by the pelvis needing to rock side-to-side as you pedal).
For an easy to obtain starting point, make the saddle high enough so that your heel just rests on the pedal when your knee is reaching full extension. Now when you place the arch or ball of the foot on the pedal, the extra functional length should provide just about the right amount of bend at the knee.
You may need to tweak things up or down 5-10mm once you’re out riding, but you’ll be pretty close to the mark. The idea is for the hips to stay level and the knees just slightly bent whilst pedalling. For those who have different sets of shoes or pedals, remember that you may well need to make adjustments due to differing sole or pedal thickness.
Of course we need to bear in mind that the concept of a ‘perfect position’ is a shaky thing; perfect for what? The ideal height for efficient pedalling may leave you lacking confidence in technical singletrack or on steep descents. Most cross-country or marathon racers learn to work around this handicap on the trickier bits of trail, and some of them do this extremely well; just watch the likes of Nino Schurter, Marco Fontana or Dan McConnell bombing the descents at full tilt! The rest of us mightn’t cope so well and could consider dropping the saddle 5-8mm below the optimum for singletrack-heavy riding. Of course if you’ve got a dropper post you can have your optimum pedalling height and lower it as required.
Fore-Aft Saddle Placement
The fore-aft saddle adjustment is a little trickier. Generally speaking, you want the saddle as far forward as possible without letting your kneecap move in front of the ball of your foot whilst pedalling; the knee joint becomes much less stable and prone to injury once taken past this point. So why not just slam the saddle all the way back? To do so would result in very little weight on the front tyre, making your bike wander like a dog in a pet food store whenever the trail turns uphill.
Here’s something to consider; over the last few years MTB seat tube angles have been getting progressively steeper which moves the saddle further forward from the outset, potentially putting the knee into the danger zone. Fortunately, and apparently without any direct correlation, many shoe manufacturers have been experimenting with longer and more rearward cleat slots, which will serendipitously help keep your knees behind the ball of your foot when pedalling. Combine a steep seat angle with some older clipless shoes and you mightn’t be able to get an effective pedalling position. Swapping shoes or fitting a rearward offset seatpost will generally right the situation but it’s something to be aware of. Obviously this is a non-issue for flat pedal users, but seat adjustment does intertwine with pedal adjustment for clipless pedal converts.
Cleat Placement
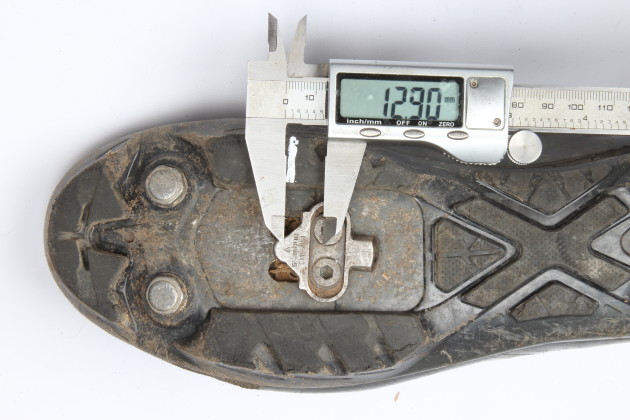
So we’ve just touched on cleat position for clipless pedal users, and the thinking is changing somewhat in this area. Longstanding theory suggests that you should position each cleat directly under the ball of your foot. Newer ideas suggest that, in most cases, you’re better off placing the cleat in a more rearward location. As a guide, try running the cleat approximately 10mm behind the ball of your foot on a size 40 shoe and half a millimetre further back for each shoe size above this. In triathlon and road time trial circles, some riders have had success placing the cleat under the arch of the foot—a position that many flat pedal riders naturally migrate to.
A more rearward cleat position offers a number of advantages. It allows you to run the saddle further forward for better weight distribution between the wheels and also places less load on the relatively small calf muscles; if you don’t understand why, try standing on a step with your heels just hanging over the edge, then keep sliding your feet back until just the balls of your feet are on the step—now you get it!
Cleat angle is also important, especially for those with sensitive knees. As a general rule, you’ll want your toes turned slightly out when you’re clipped in; this position mirrors the natural alignment of the hips, knees and ankles and helps to keep the load through your knees relatively symmetrical. A good starting point is to stand comfortably with your feet hip width apart, then look down at the angle of your feet; now try to duplicate this position with your feet clipped into the pedals.
The angle of your feet may differ from left to right, so don’t be afraid to set your pedals up this way too. Ideally your knees should be moving up and down, but not side-to-side as you pedal.
Of course this is all largely unnecessary if you ride flat pedals; your feet will naturally move to their most comfortable angle, you’ll automatically place the pedal axle somewhere behind the ball or towards the arch of your foot, and because your foot placement is more dynamic you’re far less likely to run into issues caused by repetitive movement with the feet and knees locked into a sub-optimal alignment.
Handlebar Position & Width
The connection between your hands and the handlebar is arguably the most difficult to get right; not only do you have to steer the bike left and right, you also need to be able to push forward or pull back to weight or unweight the front tyre, plus shift gears, brake and operate lockout levers or a dropper seatpost.
There’s obviously lots of things your hands need to do when you’re riding, but there’s one very important thing they shouldn’t be doing, and that’s supporting the weight of your upper body—your hands aren’t for leaning on!
In an ideal scenario your hands will ‘hover’ on the grips, which allows you to easily push or pull on the bar as the trail dictates without requiring dramatic shifts in body position. If your focus is on climbing you’ll want to bias your weight slightly forward, and if it’s descending that floats your boat you’ll want to get your weight slightly back, but for most of us the neutral hand position is just about spot on.
With that in mind, here’s some basic principles that you need to remember in order to get your handlebar position right. A longer or lower stem will shift your body weight forward—this will be pretty obvious to most. What you mightn’t realise is that a wider handlebar will have the same effect. Here’s another one; a longer stem or wider bar will slow your steering response, and vice versa. Got it? Right, now here’s where it gets tricky…
There isn’t a ‘perfect’ setup for everyone; body proportions, riding style and trail character will all play into how and where you set up your handlebar, so you need to be prepared to experiment a little in order to get the best setup for you. You might like wide bars but ride where the trails are really tight and twisty, making an 800mm bar more hassle than it’s worth. Perhaps you want to stretch your cockpit out with a longer stem, but because you ride a lot of fast rough downhills it makes your bike feel twitchy and prone to tossing you over the bars.
With the number of variables involved, you’ll be much better off changing one thing at a time. If you put on a wider handlebar, a shorter stem and remove two headset spacers all at the same time, your bike will feel very different but you won’t really know what effect each of those changes had. Session the same bit of trail to feel the effects of each change, be systematic and you’ll wind up at your best setup sooner than if you just try to wing it.
With all that said, here’s a good starting point; get the widest bar you can comfortably ride on your trails without constantly smashing your knuckles. Generally this is between 690-720mm for women or smaller riders and 710-780mm for the rest of us. While you’re at it, select the shortest stem you can fit without feeling cramped on the climbs (40-80mm), and then adjust the stem height to get your weight distribution right; neither leaning heavily on your hands nor pulling back on them.
Although there is some concession to shoulder width, handlebar length for mountain biking is about handling more than ergonomics. A wider bar will give you more leverage to steer your bike and hold a line in rough terrain. Whilst it will also pull your weight slightly forward and slow the steering a little, these effects will be offset by the shorter stem, which sets your weight slightly further back and speeds up the steering. The net result is better leverage and control with minimal change to your weight distribution. If you’re coming from an old school setup, the wide bar/short stem combo will take some getting used to. Once you're accustomed to it, you’ll feel much more comfortable and in control.
Whilst on the topic of short handlebar stems it’s worth mentioning something about cockpit lengths. Along with the trend towards steeper seat tube angles, modern trail bikes have been getting longer. Wheelbases have grown but more importantly they often feature a longer ‘reach’.
The reach is taken from a point directly above the bottom bracket and measured horizontally to the centre of the head tube. This dimension directly affects how roomy the bike feels when you’re standing on the pedals. If your bike has a relatively long reach, you’ll be able to run a short stem without feeling cramped. Bikes with a shorter reach may require a longer stem to obtain enough cockpit room whilst standing. Don’t be surprised if that stubby new school stem leaves you feeling too cramped when mounted to an old school MTB. By all means go as short as you can with a wider bar, but be realistic and don’t take it too far if your bike lacks reach.
If there’s one bike setup anomaly that I see most often, it’s riders on modern 29ers with their stem flipped and slammed to get the absolute lowest handlebar position. In some cases this is a holdover from years past when the big wheelers had head tubes as long as their 26-inch cousins. With the taller axle height and longer fork, it was often necessary to flip and slam the stem to get any weight onto the front wheel.
With modern head tubes often being 30-40mm shorter than their predecessors, these drastic measures are no longer required, yet the mentality has hung around. Unless you’re short and riding a long travel 29er, or an XC racer whose sole focus is on smashing out KOMs on every climb, don’t be afraid to raise the bar, so to speak.
Controls
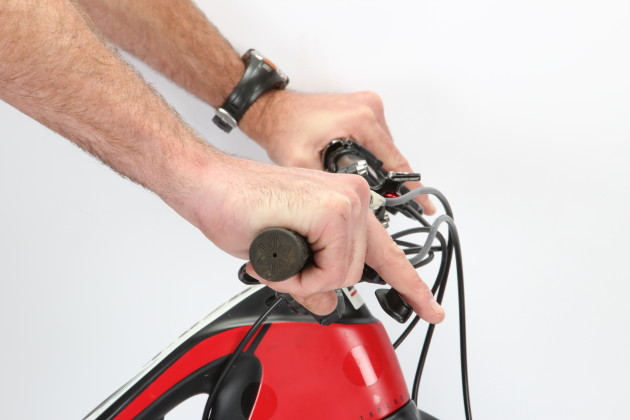
The last thing to sort out is the position of your brakes, shifters and remotes; the one guiding principle is that they should be easy to operate with minimal movement of your hands. Brake levers should be angled downward at about 45-degrees so that your wrist stays straight when you grab a fingerful of anchor. The lever should pull in close enough to the bar to comfortably rest in the hook of your finger without quite pulling all the way to the grip under heavy braking. Finally, your index finger should nestle into the hook at the end of the lever for maximum mechanical advantage—shift the whole lever inboard if you find your finger reaching for the middle of the lever blade. Modern disc brakes are good enough that one finger should be all you need—this leaves your remaining fingers able to hold a relaxed grip on the handlebar.
As for the gear shifters, they should be angled down like your brakes or even more so. You want them close enough to easily reach without stretching your thumbs, but not so close that you bump them when you’re bouncing down your favourite bit of trail. Most modern shifters have two different mounting positions, and sometimes you’ll get a more ergonomic setup if you run your brakes inboard of the shifters—don’t be afraid to experiment to see what works best for you.
At the end of the day, remember that getting the correct cockpit setup is about feeling comfortable and centred. Achieving this allows you to forget about the bike and simply focus on the trail in front of you. It’s about making the bike fit you, and your riding style, not the other way around. Start with the tips we’ve outlined, have a bit of patience and be systematic; you’ll be amazed at how much better you ride with a sorted cockpit setup. You might be out battling the terrain or your personal fitness, but you don’t need to be doing battle with your bike as well!
Saddle Height - Another Option
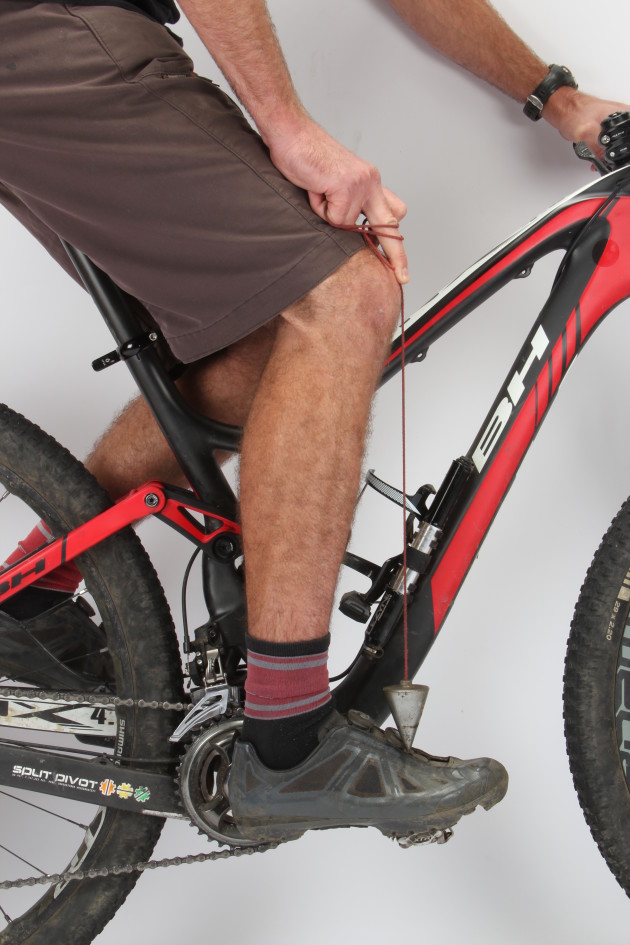
While the heal-on-pedal method outlined earlier is by far the simplest, you’ll find a number of other techniques that are a little more elaborate. Most of these methods are calculated using your inseam length.
Take your shoes off and stand with your back to a wall whilst on a hard surface. Place a hardcover book between your legs and pull it firmly up against your sit bones. Mark this height against the wall and measure from the ground up to get your inseam measurement.
Now multiply your inseam length by 0.883 (the ‘Lemond method’) and you’ll get a saddle height measurement from the centre of the bottom bracket to the top-centre part of the saddle.
An alternate method takes your inseam and multiplies it by 1.09 to produce a saddle height that’s measured from the centre of the pedal spindle at the lowest point.
Roadies have argued for years over which of the many theories are best. We’re not going down that path and if you’re really concerned, go book a session with a professional bike fitting service.
To begin with, any of these techniques should get you reasonably close to the mark for efficient pedalling and you can fine tune from there to suit your trails and personal needs.


