

MTB Frame Geometry Explained
Read any of our bike reviews and you’ll notice we bang on a lot about frame geometry. It mightn’t seem as exciting as an all-new suspension linkage, or as visually obvious as a top-end Eagle 12-speed drivetrain, but frame geometry can make or break any bike from the outset.
Experienced mountain bikers already know that frame geometry is important but it’s a very complex topic. You’ll commonly hear people say that a bike will do this or that because it has a 65-degree head angle. Well it may, but looking at one digit in isolation isn’t going to paint the full picture. You need to look at whole range of measurements and consider how they interrelate. Do all this and you’ll still be guessing, but at least it’ll qualify as an educated guess!
So what are the commonly seen metrics, which are the most important and how do they interact with each other?
Seat Tube Length
This is generally taken from the centre of the bottom bracket (where the cranks go through) to the top of the seat tube (where the seatpost exits the frame). It used to be the defining measurement when it came to bike sizing. Way back in the ’80s, MTB geometry was heavily based on road bikes; frames were more or less ‘square’ with the top tube parallel to the ground and the top tube a similar length to the seat tube. So if a bike had a 22-inch seat tube, it was a pretty safe bet the top tube was similar in length. As a result it offered a good indication of the fit and sizing on any bike.
This all changed through the ’90s as MTB frames became lower and more BMX-like with longer seatposts. With these changes the ‘effective top tube length’ became a more relevant indicator of bike fit. Many brands still use the seat tube length to describe their size options (15, 17, 19 and 21-inch for example). Other brands have moved on to simply calling their frames small, medium and large.
These days the seat tube length isn’t a reliable indicator of how a bike will fit. Seat tube length used to tie closely with the top tube height, so choosing a smaller size gave you better clearance over the frame, but swoopy modern frame designs mean that even bikes with a longer seat tube can still offer loads of crotch clearance. Now the main thing is to ensure that the seat tube is long enough to achieve a suitable saddle height but not so long that it makes it difficult to fit a dropper post.
On bikes with curved or interrupted seat tubes, you should also ensure that that the seatpost can be lowered enough to achieve the correct saddle height. If this proves an issue, regular seatposts can usually be shortened but that isn’t the case with a dropper post.

Key Points:
- While the seat tube is the measurement is typically used to describe a frame size, it isn’t critical in determining the performance, ride feel or fit on a modern MTB.
- Just ensure you can obtain the correct saddle height without taking the post above the maximum height marker or inserting it too far down into the frame—this may require a few tricky calculations when using a dropper post.
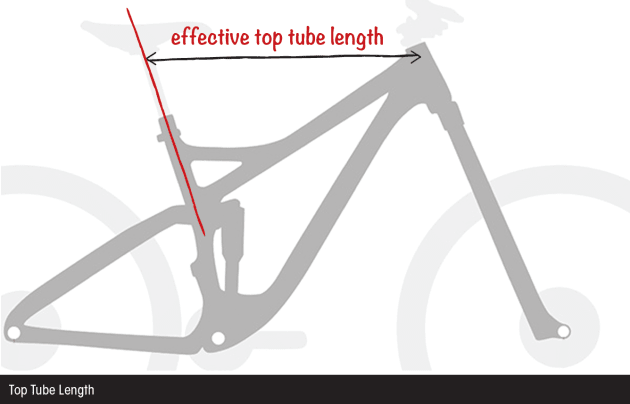
Top Tube Length (ETT)
These days we generally look at the ‘effective top tube’ (ETT) length rather than the actual measurement along the sloping top bar of the frame. The effective length is measured from the top-centre of the head tube back to the centre of the seat tube or seatpost along an imaginary line that’s parallel to the ground.
This is another measurement that has become less meaningful as frames have evolved further away from the traditional double-diamond shaped hardtail. It still offers an indication of the cockpit length, but it mainly impacts on your position whilst seated and even then the measurement can be quite ambiguous.
How can a seemingly fixed measure from the front of the frame to the seatpost become less significant? It all relates to the huge variation in seat tube angles that we encounter on modern bikes. For example, a bike could be quite short in the front end but gain a long ETT measurement by using a really laid back seat angle. While this will make the cockpit feel longer, it’ll only feel roomy when you’re sitting. As soon as you stand, the bike will feel cramped and the short front end will be acutely obvious.
On the flip side, a really steep seat angle can give a bike a short ETT measurement, even though it could be relatively roomy up front.
Key Points:
- Top tube length offers an indication of the cockpit length when seated.
- Don’t rely on this figure in isolation, as it doesn’t always tell the whole story.
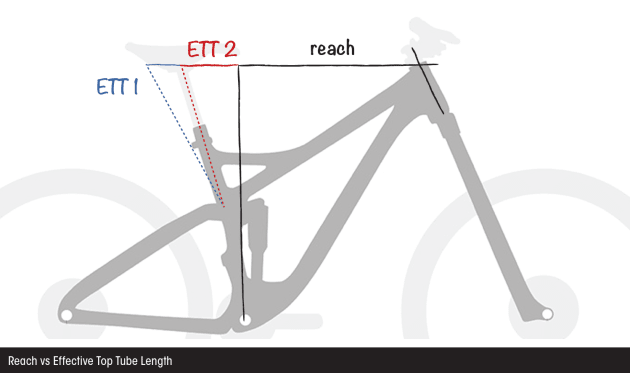
Reach
Measuring the reach provides a far more reliable indication of a bike’s size and character than looking at the ETT measurement. It’s taken along a horizontal line from directly above the bottom bracket to the centre of the head tube. Most manufacturers now list the reach in their geometry charts but you can also check it yourself using a tape measure and a plum bob (it’s easier to do with someone to help).
Reach offers a true indication of the bike’s front-end length without being distorted by odd seat tube angles or slack head angles. As a result it’s very helpful for comparing the size of different bikes. Whether you’re seated or standing, a bike with a long reach will feel roomy.
Over time we’ve seen a trend towards longer reach measurements, and this has gone hand in hand with the popularity of shorter stems on mountain bikes. Add 20mm to the reach and cut 20mm from the stem and you’ll wind up with the same overall cockpit length. Short stems provide a more direct steering feel and place your hands further behind the front axle; you’ll feel more secure on steep descents and less like you’re being pitched over the bars.
Extending the reach on a bike also makes the wheelbase longer; something that also impacts on the handling but we’ll get to that later…

Key Points:
- The reach figure provides a reliable indication of how long a bike will feel.
- It reflects on the cockpit length whilst standing.
- It’s handy for comparing different bikes as it’s not affected by the seat angle or saddle position.
- A longer reach allows the use of a shorter stem without making the cockpit feel cramped.
Stack
Stack height offers a good indication of how high the handlebars will feel. Looking at the head tube length in isolation doesn’t take the fork length and bottom bracket height into account—the stack height does. It’s the vertical distance between the centre of the bottom bracket and the top of the head tube. Obviously the handlebar height can always be tweaked with headset spacers and different stems, but it provides an accurate indication of the starting point.
This measurement is primarily of interest to smaller people who want to ride a bike with big wheels or lots of travel and don’t want an excessively tall handlebar position. Look for the bike with the lowest stack height and you’ll be heading in the right general direction. Medium to large sized riders probably won’t need to worry too much about the stack height unless they want to get low and aero or are particularly concerned about getting a low front end for climbing.

Key Points:
- Allows you to accurately compare the handlebar potential height between bikes without influence from different stems or headsets—it provides a reliable baseline figure.
- Definitely worth looking at for shorter riders on big-wheeled or longer travel bikes.
- XC/marathon racers who want a low bar height should also look at the stack height.
Head Angle
This is the angle between the ground and the head tube at the front of the frame. It offers an idea of how the bike will steer and many people fixate excessively on the head angle when looking at frame geometry.
When looked at in isolation, a steep head angle (around 70-degrees) will make a bike steer with greater precision at low speed; it’ll wander less when climbing for example. On flatter terrain it can feel more responsive and quicker to react to steering input. As the speed increases, or when you head downhill, the faster steering response becomes harder to manage and the bike begins to feel skittish and less predictable. A steep head angle won’t instil confidence at high speed or when descending steep terrain.
At low speed and when climbing, a slack head angle (65 or 66-degrees with 27.5 wheels) is more prone to wandering across the trail. Extra effort is required to pull your weight forward to stop the wheel flopping from side to side. A slack head angle can make a bike feel sluggish and lazy to steer on flatter trails.
Once the speed rises or you point the bike downhill, a slack head angle will make a bike feel more stable. The slack front end also pushes the front wheel further out in front of your centre-mass, which will make you feel more confident when dropping into steep downhills—it’s harder to get pitched over the bars. As a side benefit, raking the front end out makes it easier for a telescopic fork to absorb square edged trail impacts.
Of course the head angle is only one dimension and you shouldn’t place too much importance in it. A long wheelbase can also provide high speed stability, so don’t immediately assume one bike will be better for steep terrain because it’s one degree slacker up front. Other factors also play a role such as the fork offset and the resultant trail figure (to keep things simple we won’t be going into fork offset here but most modern forks use a comparable offset).

Key Points:
- One of the important measures of how responsively a bike will steer.
- Steep bikes take less input and effort to steer at lower speeds. It’s also easier to keep them pointed in a straight line when going uphill (an XC-race bike is usually between 69 and 71-degrees).
- Slack bikes are easier to control over rough terrain and at high speed, especially when descending (a downhill bike is 63 or 64-degrees while an aggressive enduro/trail bike is 65 to 66-degrees).
- Bigger wheels tend to add stability, so the head angle doesn’t need to be as slack on a 29er to achieve the same level of descending confidence.
- Other factors such as the wheelbase length and steering geometry also play a role, so don’t place too much importance in this one dimension.
Seat Angle
These days, with all of the complex frame shapes and suspension designs, the seat angle has become a tough thing to measure. You’ll often encounter an ‘actual’ and an ‘effective’ angle listed in many geometry charts. The actual seat angle is what you’d get if you laid a gauge on the frame while the effective angle is what it this dimension equates in traditional terms; sometimes the seat tube starts well forward of the bottom bracket or multiple curves which make actual measurement irrelevant.
Regardless of how it is measured, you want a seat angle that allows you to achieve the appropriate position over the bottom bracket for efficient seated pedalling.
What is the ‘right’ position? Generally speaking, you want the saddle as far forward as possible without letting your kneecap move in front of the ball of your foot whilst pedalling. Slide too far forward and the knee joint becomes less stable and more injury prone. Go too far back and you’ll have very little weight on the front tyre when climbing; this makes the bike harder to control and more likely to wander around when climbing.

Key Points
- While it can impact on the handling, the seat angle mainly relates to bike fit; you need to be able to get the saddle in a position that allows for efficient pedalling.
- A really slack seat angle may create a roomy cockpit without adding to the wheelbase length but it will also make it harder to keep the front wheel weighted when climbing.
- A steep seat angle and a forward biased saddle position will make it easier to control the bike and pedal up really steep climbs. Don’t take it too far however, as the knee joint can become unstable and more injury prone.
- With a fixed length seatpost, a steep seat angle will encourage a forward weight bias that can make descending treacherous (this isn’t an issue if you’re running a dropper post).
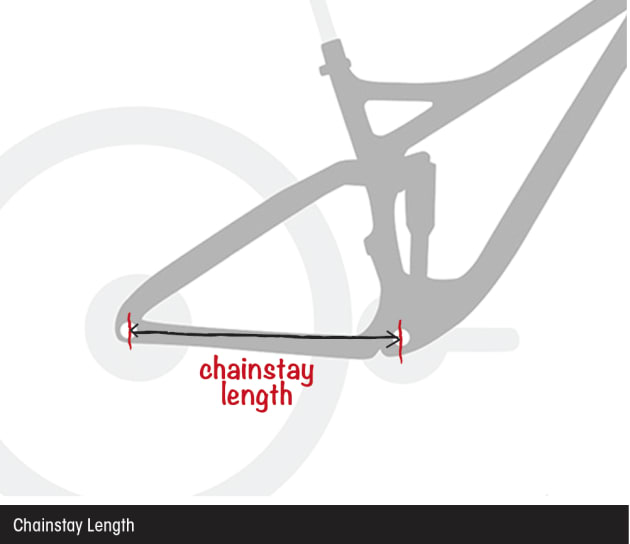
Chainstay Length
This is the rear-centre measurement of the bike, taken from the bottom bracket to the rear wheel axle. It impacts on the bike’s handling and doesn’t really relate to bike fit, although a handful of brands vary the chainstay length to keep it in proportion to the total wheelbase length.
Shorter chainstays make it easier to lift the front end for wheelies and manuals. It shortens the overall wheelbase too, which makes a bike more agile and manoeuvrable. On the whole, shorter ’stays are seen as desirable but as with anything there are pros and cons.
Short ’stays add to the playful nature of a bike but the shorter wheelbase also compromises stability when descending. Additionally, the qualities that make it easier to wheelie also mean the front wheel is more prone to lifting on a steep climb, so longer stays can be better for climbing.
Key Points
- One of the measurements that shapes a bike’s handling characteristics.
- Short ’stays (420-435mm) help to provide a dynamic ride that’s easier to wheelie and flick around on the trail.
- Long stays 440-455mm add stability and make the front end less prone to lifting on a steep climb.
Wheelbase
The wheelbase is pretty self-explanatory; it is simply the measurement from the front axle to the rear. It’s the combined derivative of the chainstay length, reach and head tube angle. While you probably won’t buy a particular size based on its wheelbase length, it can tell you a lot about how it will handle.
Long wheelbases provide stability when descending and at higher speeds but usually require more rider input to manoeuvre at lower speed, especially when the trail is tight—like driving a stretched limo through the city streets. A short wheelbase is easier to steer on slow and tight trails but quickly becomes a handful once the speed increases.
As with most aspects of frame geometry, there is no right or wrong when it comes to wheelbase length. Aggressive or dynamic riders may prefer the feel of a longer wheelbase; they can throw the bike around when required to navigate the tight stuff and then the bike comes into its own when the trail becomes steep, rough and fast. The same rider may prefer a shorter wheelbase for less demanding terrain, as it can be more fun and engaging.
When comparing bikes, take note of any difference in wheelbase length and look for where the added length (or lack of it) is coming from. Perhaps the chainstays are longer which may make it harder to loft the front wheel but more planted on steep climbs. Maybe the head angle is slacker which rakes out the front end, making it a gravity weapon but a handful when it comes to climbing.

Key Points
- The wheelbase length influences the handling with longer bikes being more stable and shorter more agile.
- To better predict the likely outcome, you need to delve into where the length is added or removed; it could be in the chainstays, head angle, reach/front centre or some combination—each can lead to subtle handling differences.
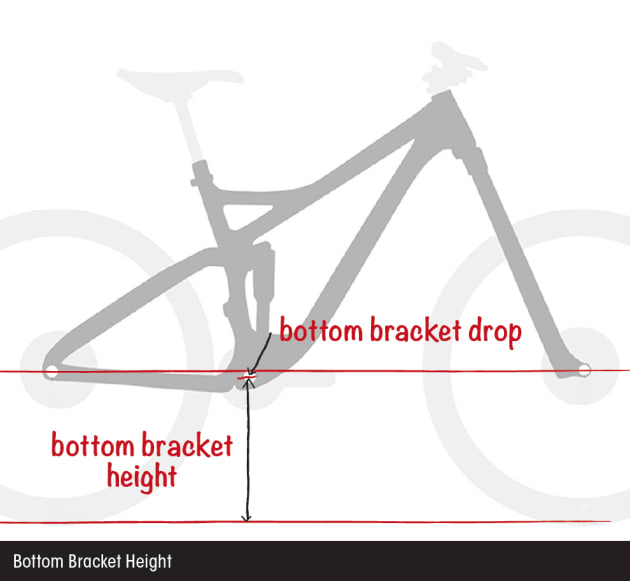
Bottom Bracket Height (or BB Drop)
The bottom bracket height is a simple measurement from the centre of your crank spindle to the ground. As this will be influenced by the tyre size (bigger volume rubber will lift the BB slightly), some manufacturers will list the bottom bracket drop instead. This is taken from the centre line of the wheel axles to the crank spindle—a larger drop means a lower bottom bracket.
Like the wheelbase and head angle, this measurement impacts on the handling of the bike. A low bottom bracket improves stability and helps you to feel centred between the wheels. Just as a Formula One car corners better than a 4WD, a lower bottom bracket can improve the cornering ability of a MTB.
The trade off comes when you try to pedal – especially over rocky or uneven terrain – as you’ll be more likely to clip pedals and bash the crank arms on the ground. With some finesse it’s possible to work around a low bottom bracket but it’ll always require more thought, concentration and some well-timed pedal strokes. Shorter cranks (running 165-170mm instead of 175mm) can also help and may be worth considering if your bike has a really low bottom bracket.
When comparing, remember that longer travel bikes will usually have a higher bottom bracket; this is to compensate for the additional suspension sag when you sit on them. Hardtails are typically lower from the outset as they don’t sag under your weight.
Key Points
- Impacts on the feel and handling.
- A lower bottom bracket improves cornering ability.
- Higher bottom brackets make it easier to pedal over uneven terrain without bashing your pedals.
New School vs Old
You may have heard people talk about new school geometry. Part of this refers to the general trend towards bikes with lower bottom brackets and slacker head angles, but it’s also about the reach and stem length.
New school bikes have a longer reach which allows you to fit a much shorter stem; somewhere in the 30-50mm range. With this setup you still have ample cockpit length but the extended reach changes the handling characteristics of the bike.
Overall, a new school bike will be much longer in the front-centre; that’s the front portion of the wheelbase from the bottom bracket to the front axle. The chainstays are generally kept short to prevent the bike handling like an ocean liner.
The end result is a bike that feels more stable when descending, as the front wheel sits further out in front. You’ll generally get a sense of being ‘in’ the bike rather than on top of it and there’s less chance of getting pitched over the bars when descending the steep stuff. When it comes to climbing, the longer reach still provides adequate breathing space and the steeper seat tube angle (another new school trait) helps to keep some weight on the front wheel for directional control.
In general we’d consider this trend to be a positive thing but as with anything there are pros and cons. Some brands are more progressive than others and some have really taken it to extremes. Going to a really long front centre will push the wheelbase out substantially, and it can place the front wheel a long way in front of the rider.
The effect of this is twofold; the longer wheelbase and added stability can make less demanding terrain feel a little mundane. Like taking a 170mm travel enduro race bike out on relatively flat and smooth trails; the ride experience would be more engaging on a less capable shorter travel bike.
The other issue relates to rider mobility. With the front wheel pushed further out in front, you need to shift your weight further forward and get more over the bars to keep the front tyre weighted and biting into the trail. Fail to do so and the front wheel will be more prone to washing out mid-turn on flatter trails. In some cases it’s a simple learning curve that requires subtle adjustment but some riders are less agile and mobile to begin with. Those who aren’t as dynamic on the bike may struggle to come to grips with new school geometry when it’s taken to an extreme.
Upsize or Downsize
Frame geometry gets even more complex when you bring the issue of bike fit into the equation. It’s not just about the wheelbase length, head angle or stack height in isolation; it also depends on how the sizing relates to your physical proportions. You may be on the cusp between a large and a medium in a particular brand, or bang on a medium in another. If you’re floating between sizes, you can choose the geometry that best suits your needs and preferences.
Opting for a larger size will provide a longer wheelbase for enhanced stability and give a longer reach; you’ll then be able to fit a shorter stem to obtain a more ‘new-school’ fit (if that’s what you desire). Just make sure the seat tube is short enough to allow for a dropper post.
Alternately, dropping down a size will produce a more agile and snappy ride that’s easier to toss around on tighter trails. In this case you’ll need to double check that you can get the saddle high enough and have enough cockpit room without doing anything that’ll adversely affect the handling. There’s no point in downsizing if it forces you to run an excessively long stem or push the saddle a long way behind the bottom bracket.
Always remember that the reach is the only really consistent measure of frame sizing. Don’t get too caught up in the size naming as provided by one particular brand; you may find that a large Santa Cruz provides a perfect fit but only need a medium sized Norco to obtain comparable dimensions.
Tying it Together
Each dimension has its place but as we suggested from the outset, you need to look at the bigger picture if you’re going to read anything into the geometry charts. Things like the seat tube length, seat angle and stack height help to ensure that a bike suits your height while the head angle, chainstay and wheelbase length give clues to the handling characteristics. Reach can have relevance in both camps; initially it’s a good measure of the cockpit length but varying the reach will also allow you to tinker with the stem length which in turn impacts on the handling.
If you’re buying your first proper MTB, you won’t have anything to gauge against. It’s best to start by looking at the manufacturers’ recommended sizing for the models that you’re interested in—most brands will list them with the geometry charts. From there you can write down the key measurements for the bikes that you’re considering and use the information we’ve provided to compare. The same process applies if you’ve already had a number of bikes in your stable, except the job becomes easier when you’ve got a baseline to compare against.
At the end of the day, you’re not going to define and rate a bike based on the geometry charts. They may point you in the right general direction and rule out some models that simply won’t fit, but at the end of the day you really need to ride a bike to truly know its character. Just as the handling is determined by a range of measurements working with each other, the suspension feel, frame stiffness, wheel/tyre choice and a host of other factors go into producing the end result, and that’s something you can only feel through the seat of your pants on the trail.
Study away by all means but don’t totally dismiss a bike until you’ve ridden it—you may be surprised!


