Suspension Dampers - Tech & Tuning
By Steve Hinchliffe | 31 March 2010
What are all these dials on my suspension and how do I go about adjusting my forks or rear shock? Steve Hinchliffe looks at the dos and don’ts of suspension set-up.
Welcome to ‘suspension setup part two’. In MBA’s August/ Sept/Oct 09 edition we ran you through the basics of setting the spring rate or ‘sag’ on your suspension. Now it’s time to get stuck into all the knobs and dials on the other fork leg; the suspension damper. Knowing a bit about how it works will make it much easier for you to get the most out of your suspension and ride with a greater degree of control, speed and enjoyment. Let’s get one thing straight from the beginning; it’s called a ‘damper’, not a ‘dampener’, and it provides ‘damping’, not ‘dampening’. If your friends insist on referring to this crucial part of their suspension like some sort of garden watering device please politely correct them.

To understand how important a suspension damper is, it helps to think about how your bike would behave without it. Imagine your wheels connected to two pogo sticks; when you hit a bump they would compress very quickly, and then spring back equally hard and fast, and then compress again, and extend again, and so on, until friction eventually used up all the energy in the spring. All this random up and down action would make for a very bouncy, buckingbull style ride. The damper is designed to stop this ‘pogo stick’ effect by controlling both how the suspension compresses under load (compression damping) and extends after a compression (rebound damping). Some high-end suspension units have both high and low speed adjustments for compression, and occasionally rebound, although many have just one adjustment for each direction. Although damper designs vary with different manufacturers, the basic principles are common to all of them. In most cases they move oil through one or more small holes (called ports), the size of which can be altered by the dials on the outside of your suspension. A good analogy is to think of it like getting a group of people from one room to another through a narrow door; even though the second room is big enough to fit everyone, there is likely to be some sort of ‘traffic jam’ at the doorway.
By making the doorway bigger you allow the people through faster; by making it smaller you slow them down. You can also change the rate of flow by opening more doors in a big impact (as happens in a shimmed damper or with a blow-off valve), or by having skinnier or fatter people. All of these variables can work in both directions if the design permits. Remove the damper, and it’s equivalent to knocking the wall down.
Rebound Damping Preventing a Backlash
The most important damper setting is probably the rebound, which controls how quickly your suspension reextends after an impact. Too fast and you’re back on the pogo stick, too slow and the suspension won’t be able to come back quickly enough to handle successive hits without ‘packing down’. Remember that more damping means slower rebound and less damping means faster. To see what I mean, try adjusting your rebound to both extremes and notice the difference in how it behaves. There are a few ways to set your rebound damping, the most common of which is to start with the rebound fully open (fastest), ride off a gutter or similar obstacle, and progressively add more damping until the suspension compresses once, extends, and then doesn’t compress again. Another method (which I personally prefer) is to compress the suspension with your body weight as fast as you can and then allow it to spring back unimpeded, and adjust the rebound so that it extends at the same speed it compressed. With both of these methods you should be able to see and feel the damper working so that the suspension doesn’t look like it’s just ‘springing’ back. The aim is, of course, to avoid having the suspension buck you off after an impact.
Bear in mind that these methods will only give you a starting point, and you may well need to fine-tune things on the trail. If you find the suspension is packing down and becoming harsh after quick successive impacts, speed up the rebound slightly; if you feel like it’s bucking after an impact (especially bad for rear suspension!) slow things down a bit. Only make small adjustments, and it’s generally best to only make one adjustment (i.e. front or rear) at any one time, so as to accurately assess the difference your adjustments have made. As a general rule of thumb, those riding more aggressively with a few drops and jumps thrown in will use a slower rebound speed than those who encounter fewer ‘big hits’, although there is certainly a degree of personal preference involved. I generally find that most newer riders, and even some experienced ones, often have their rebound set too fast. It’s also important to remember that the rebound damping is working against the energy of the spring, so if you adjust your spring rate (i.e. pump more air into your shock), you will probably also need to re-adjust your rebound damping.

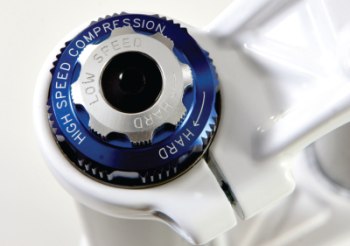
Highs & Lows of Compression Damping
There are generally two types of compression adjustment; high speed and low speed. The ‘speed’ does not refer to how fast your bike is going, it relates to the speed at which the suspension compresses. For example, doing 30kph over a smooth water-bar is probably a low speed compression, whilst hitting a square 15cm high rock step at 5kph is almost certainly a high speed compression. Medium to large drops, especially if the landing is flat, are always a high speed compression. Although there’s always some crossover, low speed damping normally affects how the bike responds to rider weight and braking forces, whilst high speed damping changes the suspension behaviour relative to bump absorption. If your suspension only has one compression dial it is almost certainly a low speed adjuster. Low speed (LS) compression damping can be used to effectively tune out unwanted behaviour such as suspension bob and brake dive. Going back to the original analogy, adding more LS damping is like making the doorway between the rooms smaller. If you find your suspension moves excessively when you pedal hard, try increasing the low speed damping until things settle down. Similarly, if you find your fork wanting to dive through its travel whenever you brake hard, adding LS damping can help to keep the front end riding higher in its travel. Be wary of adding too much LS damping though, as on simpler suspension it will make the ride too stiff, and bump absorption will be sacrificed; perhaps acceptable if you are an XC racer, but not so hot for trail riding.
On top-level suspension, especially the longer travel variety, there is often a separate adjuster for high speed (HS) compression damping. As per the original analogy, HS damping is like opening the ‘emergency exit’ to allow more people through when required, and the adjuster will change how easily these extra ‘doors’ are opened. Tuning the HS damping can greatly improve the way your bike tracks the ground and handles harder impacts. For example, in the last article we discussed how important appropriate sag was in maintaining traction, but what if running 25-30% sag means your suspension bottoms out too easily on medium to large hits? Easy; add more HS damping, and the HS ports won’t open so easily, giving your suspension less tendency to bottom out. Conversely, if you find your bike lacks bump compliance and bounces around like a hardtail in rock gardens (often called suspension ‘spiking’), try backing off the HS damping to make it more sensitive to terrain inputs. Having both LS and HS adjusters may add complexity to your suspension setup, but it gives you a degree of control over suspension behaviour which is almost limitless.
Off-the-Dial Tuning
So what do you do if you don’t have adjustable damping on your basic model oil damped fork, or if the dial adjustment doesn’t offer a broad enough range to give the suspension feel you want? The answer is often oil tuning; by using lighter or heavier oil in the damper, you can either decrease or increase the range of damping available. Again going back to the analogy, it is like making all your people either thinner or fatter to vary how quickly they can go through the door/s. Whilst not as easy as turning a knob, oil tuning can open up possibilities that are well outside the ‘normal’ performance envelope of your suspension.
Different oil viscosities can even be mixed together to allow very precise tuning, and changes of as little as 5-10% can make a huge difference to overall performance. A few words of warning however; firstly, varying the oil weight may void your warranty. Secondly, remember that oil tuning will have equal effects on both rebound and compression damping. Lastly, the oil weight (5wt, 10wt, etc) is essentially useless for oil tuning, as the SAE standard is so broad that one brand of 5wt oil may be heavier than another brand’s 10wt. If you plan on oil tuning, make sure you have the viscosity of your oil in centi-stokes (CSt) and don’t mix different brands of oil.
Tune-in & Win
So now you know how to set up your suspension damper, don’t be afraid to get out on the trail and play around with different settings. Try riding a familiar piece of trail as you fine-tune things so you can fully appreciate the differences, only make one adjustment at a time, and remember that on-trail performance is more important than settings in a handbook; you may be surprised at how much better your suspension can work. Get out and get tuning!