


These days virtually every mid-to-upper-end MTB comes with internally routed cables. Hidden cables have introduced an element of the unknown that deters otherwise mechanically proficient riders from doing basic maintenance. If you’re lucky, your frame may have built in pipes that guide the new cable straight through. However most don’t and sometimes the exit ports are quite small, so it’s a bit like trying to thread a needle whilst blindfolded. Sure, you can offload the problem onto your local bike shop, but sometimes it’s good to do your own work—especially when you need to replace a cable the night before a big ride.
While internal cabling can test your patience, there are a number of tricks that can make the task far easier. Some techniques will work better than others; there’s no one solution for all. Still, arming yourself with this arsenal of ideas will give you some direction. Try them out and see what works best on your bike. You may find one method works on the down tube but not the chainstay for example, so keep your options open. Once you find a reliable strategy, cable replacement can again be a straightforward task and your bike will run better as a result.
ROCKSHOX BARB
This is our favourite hassle-free technique when the old cable is still in place and runs with a continuous length of outer casing from the shifter to the derailleur. The only catch is that you’ll need to find yourself a double ended barb like the ones that are supplied with a RockShox Reverb dropper post. If you don’t own a Reverb, ask around at your local bike shop and you may get lucky—they’re super handy to have.
Start by removing any restrictive entry ports where the cable enters the frame. Then undo the inner wire at the derailleur end and pull it through the outer housing. You may need to cut the end part off as it’s often squashed and frayed.
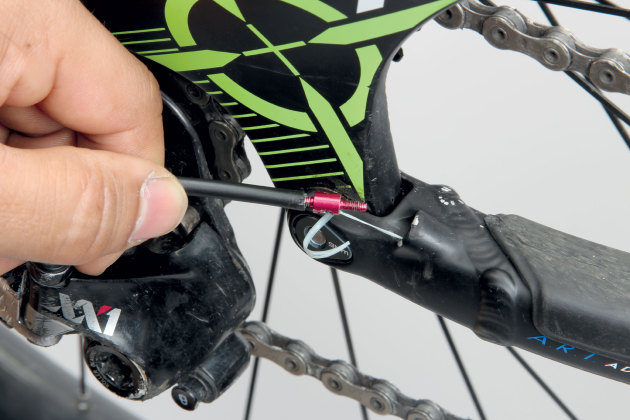
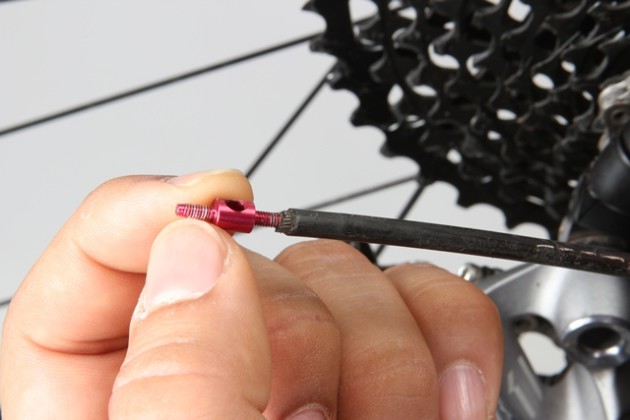
With the inner wire removed, partially thread the barb into the old outer cable. Once it starts to wind itself in, place the new length of outer cable on the other end of the barb. Insert a 2mm allen key or something similar into the hole that’s in the middle of the barb. Hold both cables steady and turn the barb; the opposing ends will thread their way in and link the cables together.

Once you’re sure the barb is securely joined at both ends, slowly and steadily pull the old cable through whilst simultaneously pushing on the new cable. If the cable gets snagged at any point, push it back and forth to free it—don’t pull or you may dislodge the barb.
At a pinch, it may be possible to craft your own joiner from a regular 2mm (14 gauge)spoke. Keep the threaded end part and cut a5-10cm length. The threaded end will wind snugly into one side of your gear cable while the other will just push in. A wrap of tape can help to hold it together but don’t make it too bulky or it may snag on the way back through the frame.
With the new cable all the way through, cut it to length, fit the end caps and slide a fresh inner wire through. This technique also works well with hydraulic lines—after all, that’s what RockShox makes the barb for.

MAGNETS
This technique is handy if there’s no existing cable in the frame to act as a guide. It won’t work with hydraulic hose or stainless steel inner wires, but for other cables a really strong magnet can help. Neodymium rod magnets are a good place to start and they’ll work best if they’re small enough to fit inside your cable exit points. As with the previous technique, removing any covers to reveal the largest possible exit window will make the job much easier.

Sometimes you can guide the outer casing through first but in other cases it may be easier to pass the inner wire through and then use it to guide the outer casing. You may as well try the outer casing to begin with—it’s the better option if it works. Slip it into the frame and push it along until the end draws level with the exit port. Shine a torch into the hole and you should be able to locate the cable housing. Now place the magnet into the window and you should be able to snag the line—don’t drop the magnet whatever you do!

If your magnet is small and hard to hold onto, you can tape it securely on to the end of a screwdriver to provide a longer reach. If it’s hard to wrangle the cable through the exit port, put a bend in the last 20mm of the housing and try it again. Also try twisting the cable housing around when it’s inside the frame. If your magnet is strong enough, it won’t be hard to catch the cable and guide it through.
Another tactic is to use a small hook to pull the cable out. This works best when you’re fishing for an inner cable. The hook can be fashioned from a spoke or even a paper clip. Use the magnet to grab onto the cable and bring it close to the window, then guide it through with your hook.

Dental Floss
Last of all is the dental floss technique. Unravel a stretch of regular floss or string that’s greater than the distance between your inlet and outlet points. Fit your vacuum cleaner with a narrow blade attachment and place over the frame exit point. Hold it snugly up to the frame and the vacuum should draw the floss straight through the tube.

This won’t work in every case; sometimes you won’t get good suction through the frame while other times the airflow won’t take the floss exactly where you want it to go. In this demonstration, it worked first time every time on the chainstay but wouldn’t work on the main frame (we found the magnet easier on the down tube).
Once you’ve got the floss through, it can be tied to a RockShox barb to pull the outer cable through. Alternately, you can attach it to the inner wire using an alloy cable end. Cut the tip off the cable end and open it up so it slides right over the inner wire. Slip the floss underneath and crimp the alloy end to hold the floss in place. Now you can pull the wire straight through and use it to guide the outer housing.

Park IR-1 Kit
If playing with hooks and dental floss doesn’t sound like your thing, Park Tools makes a kit that’s specially designed for internal routing jobs. It includes a range of magnetic connector lines and cable fittings that will handle all manner of cables and wires for electronic gear setups. It’s a brilliant piece of equipment but it will set you back around $140.


