
How to Ride Rocky Trails
It always seems a little strange when you watch different riders tackling the same rocky section of trail; there are those who seem to effortlessly glide over the rocks as if they weren’t there, making the trail look as though it was perfectly smooth, not losing an ounce of speed in the process. Then of course there are those at the other end of the scale, who grind to a halt at the mere thought of tackling those evil boulders, and try in vein to thread their way at virtually zero speed through the rocks, dabbing and floundering every few metres—it can be painful to watch at times. Most of us linger somewhere in between these two extremes, which means there’s plenty of room for improvement, and mastering the rocks can greatly benefit your everyday trail riding. Not only will it make you faster, it will make you a whole lot safer, reduce punctures and other potential bike damage, and make the whole experience a lot more fun.
There are numerous factors to be worked on when it comes to mastering rocky rides, and when broken down and dealt with individually they become easier to improve on, and then combine them all together until the whole thing becomes second nature. Job done!
Bike Set-up
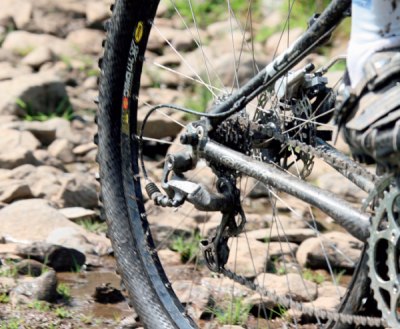
If you are heading out on a particularly rocky ride then there’s no doubting that a full suspension bike could save you a whole heap of energy and iron out a multitude of errors, although many a purist would still prefer a hard tail for its razor sharp handling. Your suspension shouldn’t be too soft for normal rocky trail riding, and your position should be fairly upright to help in keeping your weight off the front wheel. It’s also a good idea to make sure your pedals aren’t adjusted too tightly, as you may well need to get your foot out in a hurry. Fatter tyres are a definite plus on rocky ground. Not only do they take more rock impact without puncturing, they also take a lot of the jarring out of the trail, saving your wrists from extra pounding; 2.1 to 2.4 inch wide tyres are ideal. Selecting tyre pressures is a real balancing act. Lower pressures will help to smooth the ride and improve traction but will also substantially increase the risk of pinch flat punctures and rim damage. For this reason it usually best to increase your tyre pressures when riding rocky terrain. Skilled riders (the ones who finesse their way effortlessly through the boulder fields) can get away with standard or lower air pressure—as long as they don’t make any mistakes. Tubeless tyre systems will allow you to use lower pressures but you still run the risk of rim damage. If in doubt, put an extra 5psi in your tyres for particularly rocky terrain.
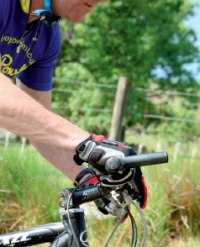
Body Position Your upper body and how you use it is a huge factor in mastering tricky rocks. First and foremost is to remain relaxed and fairly upright to allow you to manoeuvre around and look ahead. The idea is then to use your body to stabilise the bike and keep traction without getting hammered by the blows from the rocks. Keep the bars held firmly without clamping them—you don’t want to get the dreaded ‘death grip’ as this tends to lock your upper body solid. Your wrists and elbows should remain flexible and allow the bike to move around and roll over the rocks, not plough into them. Your arms and legs remain your most effective suspension no matter what sort of bike you ride. On downhills or fast sections you should try and stand off the saddle and push your weight back with your knees slightly bent, allowing the bike to do its own thing beneath you. On flatter trail you will need to pedal to maintain momentum.
Rather than standing completely, use the pressure that you are putting on the pedals to force your backside slightly off the saddle.The idea is to hover just above the saddle, allowing the bike to move underneath you whilst you pedal. On steep climbs you will need to pull your weight forward. Use the effort of pushing on the pedals to drive the rear wheel into the ground for traction. Either stand or hover a fraction above the saddle to allow the bike to move under you and clamber over the rocks. You really need to look ahead and pre-empt your gear selection when approaching a rocky section of trail. You are usually committed to that gear once you’re in the thick of things, and changing can be a struggle. Chain tension is a big issue, especially on downhill and fast sections; try and keep as much tension as possible by using the big chain ring and lower rear gears, to prevent unshipping due to vibration. On most rocky sections it pays to use a bigger gear than normal and to blast through—this keeps your weight off the saddle, keeps momentum high and helps with traction. Spinning a small gear encourages you to stay seated and is a sure-fire way to lose momentum when you need it most. It’s only on longer and uphill sections where you may need to switch down a gear to pick your line through.
Picking Lines
The smoothest and fastest route is always the objective. Look well ahead and focus on where you want to go, not where you want to avoid; because as sure as eggs are eggs you’ll go where you’re looking. At higher speeds and on smaller rocks it’s important to commit fairly rigidly to one line, as switching course every few seconds will get you into trouble. On uphills or large solid rock sections you can pick and chose a little more as you go, but try to avoid extreme movements. Try to break the trail into 3-5 metre sections and piece them together mentally so you end up in the right place for each section.
 Front End
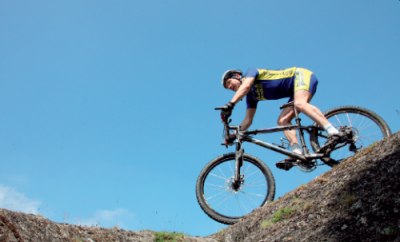
Keeping your front end light and free, but under control, is very important. Allow the bike to go straight ahead as much as possible—avoid sharp turns that can throw everything out of sync or make the front wheel dig in and throw you off. Stay relaxed and allow the front end to be light. You pretty much want the front wheel to do its own thing with just a little pilot guidance to lift the front end and assist it in rolling over any bigger rocks. On the up hills, the front wheel can be hoisted skywards with a hard pedal stroke and a brief weight shift to the rear. On faster terrain, you should lift or unweighted your front wheel by throwing your body weight towards the back of the bike.
"Always remember that if your front wheel makes it over a rock, 90% of the time your back wheel is going to follow through. Just keep light on the saddle or stand up and let the back wheel roll through."
Mind Over Matter
Perhaps the biggest factor in being a successful rock rider is how you approach things mentally, which largely boils down to confidence. When we’re younger many of us have far too much confidence for our own good. Over time wisdom tempers this exuberance—or at least that’s what we like to think. But a sensible level of confidence plays a big part in how you ride rocks, and this can be boosted a whole lot by working on the other elements until you know your limits—and then learning to push them some. Having the confidence to head in to a rocky section and to commit your mind and body to the task ahead is vital. If you seize up and slow down on entry, just waiting to put that foot down, then that’s what you will do—worse still you could end up in a heap. The key is to relax and believe a little more.


