
Training: How to Peak for an Event
 Let’s say you’ve made a bet. You’ve stupidly opened your mouth – perhaps after a couple of post ride carbohydrate recovery drinks – and boasted about your abilities and how you’ll knock over this 100km course in under six hours, or better your mate’s lap times at the Mont. Either may be possible but you’ll need to be at your absolute blinding best. Well, you need a lesson in the black art of ‘peaking’.
Peaking is when all of your plans come together and you’re physiologically and mentally at the top of your game—it’s as simple as that. There is science and logic behind the peaking process though. It’s not just about training really hard and focusing on something. If you don’t have your wits about you, it could all go horribly wrong, so my intention here is to highlight the theory and remove the guesswork.
Ultimately, successful peaking comes down to planning and a little bit of basic education. It may be that you want to have some good form at various points in the year, but want your best form at a specific time, for a certain event. All of this can be planned and if you follow a simple set of rules, it will work for you.
However, the one thing you can’t do is peak for everything. You have to be selective and it will mean that there are certain points within the peaking cycle where you will appear to underperform; especially if you’re undergoing a period of very heavy training at the same time another person is peaking for their chosen event. You’re going to be tired and slow and they’re going to be fresh and fast. The great thing about planning for your peak(s) is that you should be able to recognise quite easily from your plan when your best performances are going to be. Form isn’t mysterious and you don’t just have ‘bad days’. There’s always a reason for a bad performance and there’s always a reason for a good one too.
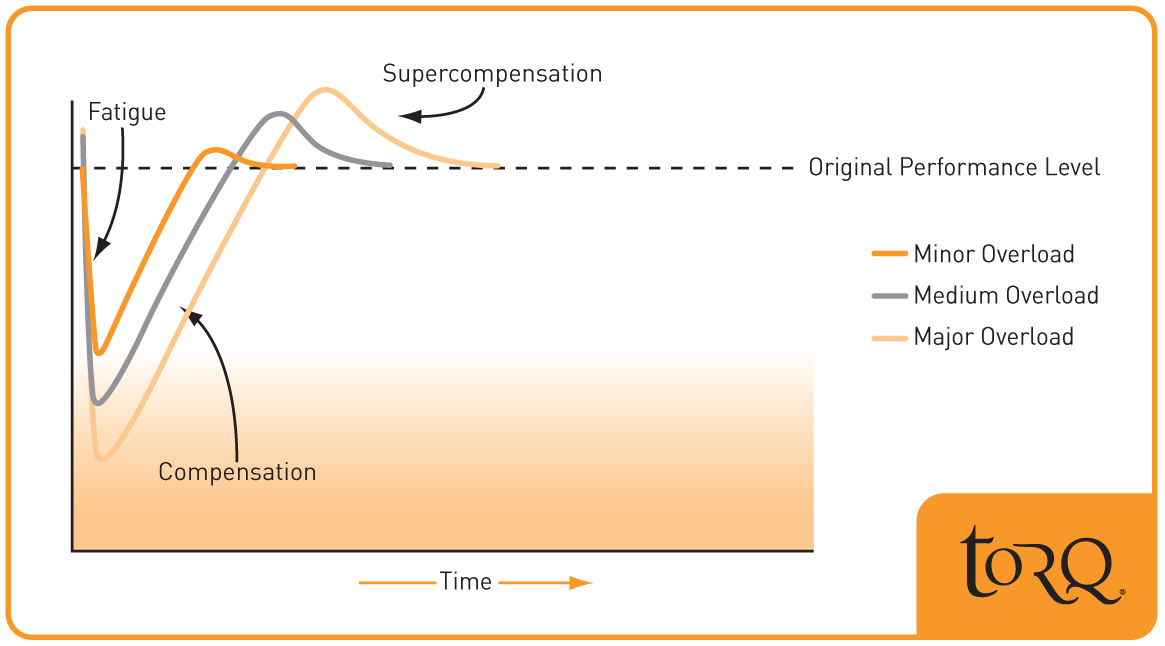
There’s solid theory behind peaking for a big day and the ‘Training Phases’ diagram taken from my sports science bible called Periodization by Tudor O Bompa. We have adapted it to make it a bit clearer. As good as it is, I wouldn’t suggest you rush out and buy Bompa’s book, because it’s about as easy to read as the original ‘Bible’ before it was translated to English, but there are some fantastic illustrations in there if you like looking at pictures.
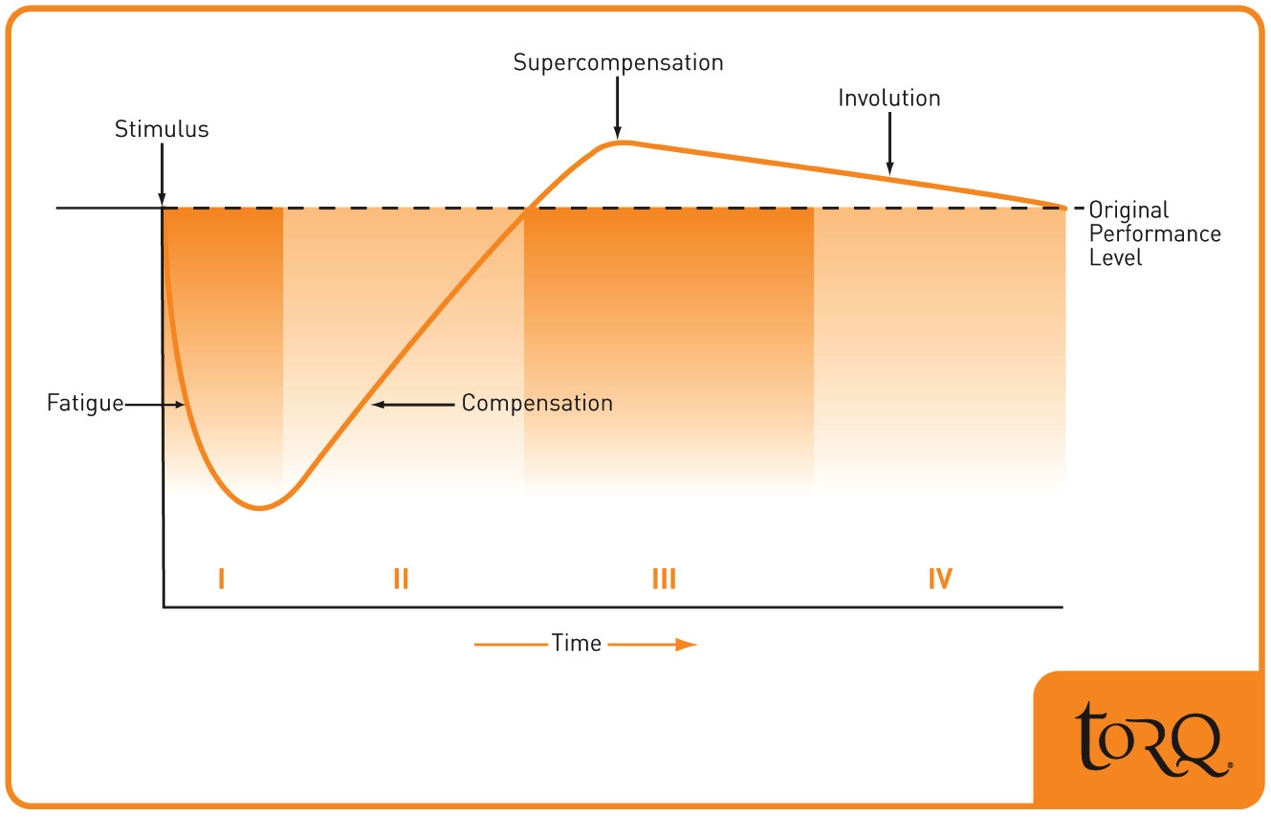
This diagram explains the training process beautifully. If you consider the vertical axis to be your ‘energy level’ and the horizontal axis to be ‘time’, Phase I shows the fatigue induced by a training session. Phase II demonstrates the body recovering and Phase III indicates an over-energised state, where the body has actually over-recovered, making it stronger than it was before the training session. Phase IV shows a regression as the over-energising wears off.
Each phase is of importance, but it’s Phase III that we’re obviously interested in—the getting stronger bit. How does this happen? Clearly and simply, this is how all biological systems respond to a stimulus. We are not machines, so we don’t perform the same amount of consistent work, day in day out and get parts changed when they wear out or break. We are adaptive organisms, which means that when we’re put through hardship, we become weaker for a short time (Phase I). The shock of the stimulus causes our body to throw every resource it has at the situation (including important components of our diet) to facilitate repair and re-energising (Phase II). It’s little wonder then that we get ‘super-compensation’ (Phase III) when you consider how over-resourced we become in the panic to recover.
Pretty heavy eh? It’s just a simple lesson in how our bodies respond to exercise. Obviously, if you can time things correctly, with a little help from this article, you can be highly energised and super-compensated on a weekend of your choice. It’s taking advantage of your body’s panic response to the training stimulus that enables you to peak specifically for an event.
Fatigue Cycle
Flirting with Fatigue
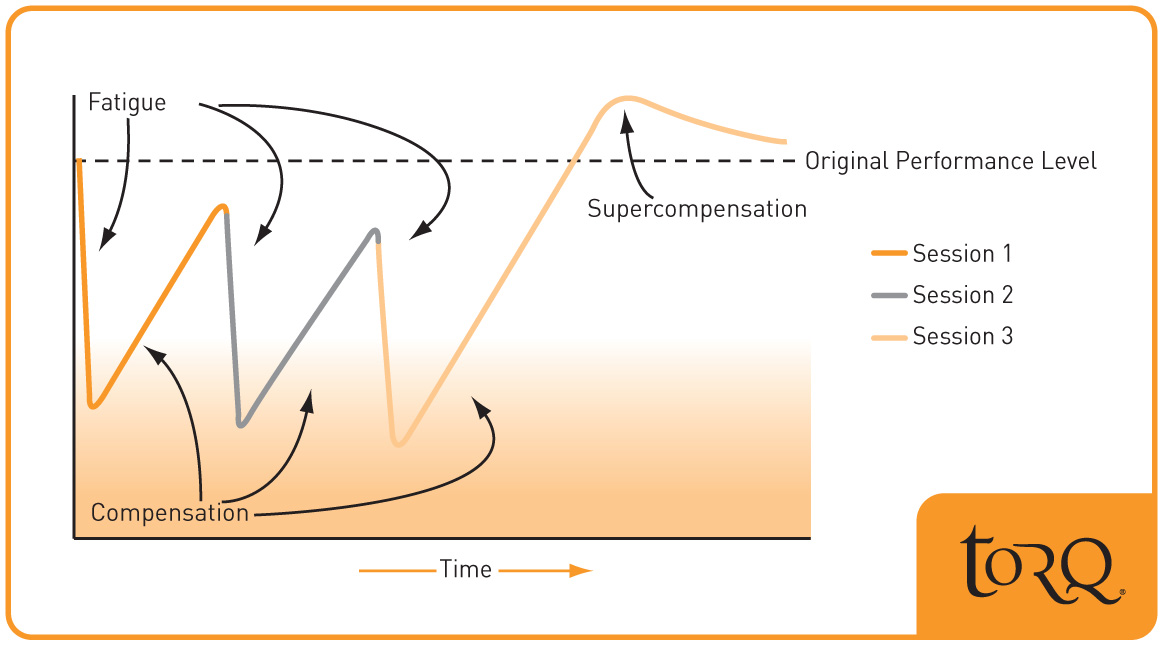
Next take a look at the ‘Fatigue Cycle’ diagram and notice how the same theory applies over multiple days of training. Consecutive sessions are strung together with inadequate recovery deliberately factored in-between each session. This leads to a cumulative trough of fatigue that gets deeper and deeper over time.
The basic rule is that the harder you train in an individual situation (based on the intensity and duration of the session), the bigger the individual fatigue stimulus, but if you then combine this with an increase in the ‘frequency’ of training, you are deliberately truncating the recovery process. This provides insufficient recovery and builds a cumulative trough of fatigue over consecutive sessions.
If you continue this without regard, you will get more and more tired and your performance will suffer. Every session will become at best mediocre and your race results will suffer too—it’s known as overtraining and it’s a relatively common trap. You can even make yourself ill; in extreme cases, it can result in a rather serious state of affairs called ‘overtraining syndrome’ which is effectively chronic fatigue.
Having scared you into not overtraining let me reassure you that if you utilise the concepts within the Fatigue Cycle diagram, and apply some basic common sense, it is beneficial to force your body into a shortened cycle of overtraining, to induce a bigger trough of fatigue, from which you will get a larger super-compensation or ‘peak’. This is very different to relentlessly overtraining without regard for the benefits of utilising the interplay between loading the body and the recovery process. In the world of coaching, these periods of loading are called ‘high load weeks’ which are systematically followed by ‘low load weeks’ to allow for recovery and adaptation.
To peak for an event, you need to string together a whole bunch of high and low load cycles, progressively increasing the loading within the high loads before tapering your training prior to the event with 10 to 14 days of lower load. Within this tapering period, the exercise volume is cut but the intensity is maintained. You peak because you’ve benefitted from a period of accumulated fitness through progressively increased training loads, followed by an extended period of rest, which leaves you physiologically and psychologically as fresh as a daisy!
If you race during this build up to peak form, you will certainly be ‘fit’, because of the amount of training you will have been doing, but generally you’re not going to be ‘fresh’. Don’t be too hard on yourself if you don’t perform well at this time; the performance is there, sitting in the background—you just haven’t let it out of the bag yet. Your best performance will come when you’re both fit and fresh, as described before.
Another scenario that people find themselves in is to be ‘fresh and unfit’ because they don’t do enough training to build form. This is a very undesirable state to be in; what’s the point in being fresh if you have no fitness?
So far this article has sounded pretty darn serious hasn’t it? We’ve covered training theory, which is pretty scientific, but at the same time it’s also pretty logical. You have to train hard to get the benefits, but you need to allow your body time to adapt, recover and get stronger. If you do too much training, you don’t leave room for adaptation and if you do too little, you won’t adapt in the first place—it’s called ‘hitting a plateau’.
Peaking For Punters
Of course not everybody reading this is super serious about their riding, so in the following example I’m going to stay away from the specifics of heart rate zones and the like. The concept of peaking can be for everyone and you don’t need to be a serious race snake to benefit from it. Maybe you’ve entered a one off event, paid good money and want to make sure that your riding time in the weeks leading up to it is well planned. By understanding how the body works, you can adapt your riding to give you the best chance of performing to the best of your ability in a less formal setting.
For instance, I know that if I do a lot of riding this weekend and keep things going for Monday and Tuesday too, that will be four days of accumulated fatigue that will pay dividends the following weekend if I then let my body rest from Wednesday onwards. The ‘Recovery Time’ diagram shows simplistically how recovery takes longer if the training session is harder, but the eventual benefits are greater. Again it’s pretty obvious stuff but this knowledge can be used to your benefit.
So let’s consider an example where the aim is to peak for an event in 12 weeks’ time. The best way to start planning is to work back from the event rather than forwards up to it. The event is on a Sunday at the end of Week 12:
Week 12: Taper: Continued further seven days of tapering leading up to event.
Week 11: Very High Load followed by 10-day Taper: The hardest training you’ve done to date, up to the Wednesday and then rest up and start looking forward to the event in 10 days’ time.
Week 10: Very High Load: Your hardest training yet.
Week 9: Very High Load: Your hardest training yet.
Week 8: Low Load: Recovery week to facilitate adaptation and increase fitness.
Week 7: High Load: Heavy week of training - slightly harder than weeks three and four.
Week 6: High Load: Heavy week of training - slightly harder than weeks three and four.
Week 5: Low Load: Recovery week to facilitate adaptation and increase fitness.
Week 4: High Load: Heavy week of training - slightly harder than week one.
Week 3: High Load: Heavy week of training - slightly harder than week one.
Week 2: Low Load: Recovery week to facilitate adaptation and increase fitness.
Week 1: High Load: Solid week on the bike to get you started, but don’t overdo it!
Although the description of ‘what to do’ in this plan isn’t hugely accurate or overly scientific, it does incorporate all of the principles that have been discussed so far.
Again without being overly scientific, let’s separate your rides into two types:
1) Intensity focused rides
2) Volume focused rides
Without going into too much detail, you need to do both if you’re going to be fit for the big day. If you were to have an individually tailored plan from a coach, they’d look at your event goals and the amount of ‘intensity’ and ‘volume’ would be programed specifically for you. However, I’ve executed enough coaching to know that in most disciplines, you need a balance of aerobic and anaerobic power.
In simple terms, intense rides work your anaerobic system. This provides the icing on the cake for your training, giving you the bolt-on power that gets you up short sharp inclines and allows you to sustain a higher than ‘average’ pace. It’s like the nitrous button on a drag car.
Your volume rides work your aerobic system, which is your bread and butter. You don’t use your aerobic system to produce high peak power outputs, but it sits there, often referred to as ‘base’ and it provides your background power. Think of it as the ‘cake’. There’s no point in having any icing if you don’t have any cake to put it on! Your best results come from combining both aerobic and anaerobic power and that’s essentially what a balanced training program is all about.
Apply the Theory
So as a rule of thumb, don’t do any more than two intensity focused rides per week (three as an absolute maximum). An intensity focused ride is any ride that is relatively short duration (under 1.5 hours) and ‘hard’. This could just be a hard ride with mates, or it could form an interval session with fast and slow bouts of exercise. It’s the high power, high intensity bouts of exercise that stimulate the anaerobic system. A clue as to whether you’re doing this kind of session right is the amount of pain you’re going through. If it doesn’t hurt, you’re not doing it properly.
Your volume rides must be kept steady and relatively easy; generally you should finish feeling like you could go on for quite a bit longer. These should constitute the rest of your training. You might start your first high load training week with two high intensity rides and two volume-focused rides. As you get fitter and capable of tolerating a higher training load, you stick to your two intensity-focused rides but introduce an additional volume ride as well as increasing the duration of your two existing volume rides.
For your 10-day taper, this is effectively 10 days of low load training—it’s basically an extended rest period. A textbook taper involves a significant reduction in the volume of the training you’re doing, so you’re spending much less time on the bike, but you shouldn’t let the intense sessions fall by the wayside. So, if one of your intensity focused sessions is usually 1.5 hours, cut it back to 30 minutes, but keep the intensity of your riding the same as it would usually be.
You’ll be recovering because your body will be doing less work than normal, but maintaining the intensity keeps the neural floodgates open and keeps you feeling spritely. Basically, when you ride intensely, your nervous system engages all of your muscle fibres and too much slow riding will shut the neural pathways down, albeit temporarily. The last thing you want on event day is to be physiologically fresh, but you can’t tap into the power you have, because your nervous system has gone to sleep!
Keep the intense bouts going right up to the event. Also, don’t expect to feel fantastic at the start of your taper period, because if you’ve done this properly, you’ll be knackered. If you really back off, you’ll notice that you start to feel really strong a few days before the event and you’ll be bursting with energy.
Prepare to Launch
So, your training plan and taper have gone perfectly to plan and you’re super-compensating quite nicely as the big event approaches. In the final stages of your preparation, a carbo-loading regimen will supercharge your liver and muscles with glycogen (the name given to the glucose that’s stored in the body). Carbohydrate is vital if you want to unleash your power and endurance potential.
If your event is less than 1.5 hours in duration, you won’t need to carbo load, but you’ll probably be riding longer than this in most MTB events. Sports science texts outline various methods for carbo-loading, but a study performed by the University of Western Australia (2002) showed one regimen that was proven to be more effective than any other, by a long way.
This research, which was published in Medicine and Science in Sports and Exercise, offers a very straightforward protocol. It involves performing a three-minute maximal intense burst of exercise just 24 hours before the big event, the rationale being that high intensity exercise has been found to stimulate greater rates of muscle glycogen synthesis (storage) than moderate intensities.
The aim during the three-minute bout is to push lactic acid levels through the roof, as this is the signal to initiate glycogen synthesis—you’ll know that you’ve done it right because it really hurts! Although some may question this practice so close to an event, the researchers were confident that such a small amount of exercise wouldn’t compromise the effectiveness of the overall pre-event taper.
Within 20 minutes of completion of the three-minute bout, the ‘eating’ begins whilst enzyme activity is still vigorous. The aim over the next 24 hours is to consume 12 grams of carbohydrate per kilogram of lean bodyweight. That’s a mighty large amount, so you’ll need to consume high carbohydrate/low fat foods. Use of an energy drink is almost essential to ingest the levels of carbohydrate required. Check with the ‘Carbo-Loading Menu’ if you’re unsure what constitutes carbohydrate.
Carbo-Loading Menu
Here’s a non-exhaustive list of some foods that will be useful when carbo-loading.
• Pasta
• Rice
• Potatoes
• Bread
• Cereal
• Noodles
• Dried Fruit
• Low fat popcorn
• Scotch pancakes
• Chelsea buns
• Sweets (boiled or gums/without fat)
• Anything sweet that’s low in fat (assuming it doesn’t contain artificial sweeteners).
Head Space
So you’ve peaked physiologically and you’re loaded with carbs, but what about your mental state? If you’re going to do well in your event, you’ve got to be looking forward to it; you need to be positive and driven to complete it.
The hard training and physiological taper helps with this; as by the time the event takes place, you’ll be about ready to explode! You won’t have ridden your bike much for days and you should be literally climbing the walls.
However, without being negative in any way, it’s always best to ‘prepare for the worst and rejoice in anything less than the worst when it actually happens’—it’s a bit of a motto for us. It’s all about being realistic.
For instance, some people do all the hard training and expect the event to be easy. Well it’s always going to hurt if you’re trying to get the most out of your body—especially if you’re racing against other competitors. Rule number one is that it doesn’t get any easier, you just get faster.
Be realistic, train hard, prepare well and remain positive and focused, but don’t expect it to be a heavenly experience—it shouldn’t be if you’re trying hard enough. You can smile and chill at the end with a beer, knowing that you’ve left your heart and soul on the trail and you couldn’t have done any more...


