It’s a relatively common tale of woe; “I took my fork in to be serviced as it was making a funny noise, now the shop wants to charge me $700 for the repair and it was only two years old!” Unfortunately many are unaware of the maintenance needs—it's only discovered when it is too late.
Every brand will offer a recommended service schedule. Check the manufacturer’s website for the specifics as it will vary from one brand to the next and each model can have differing requirements. We’re using a 2013 Fox Float with the FIT cartridge but even if you don’t have this fork, it should provide some idea of what’s involved.
With this fork Fox recommends that you replace the oil in the lowers after 30 hours of riding. For the 2014-16 FIT forks, the service interval increased to 125 hours thanks to updated seals and oil. By swapping to the newer components on this 2013 fork we can now follow the longer service intervals (this only applies to the FIT models).
While it’s not rocket surgery you will need basic mechanical skills, the correct tools and oils as well as the model-specific instructions to complete this service. If you don’t feel comfortable with this, take it to your local MTB savvy bike shop and get them to do it for you.
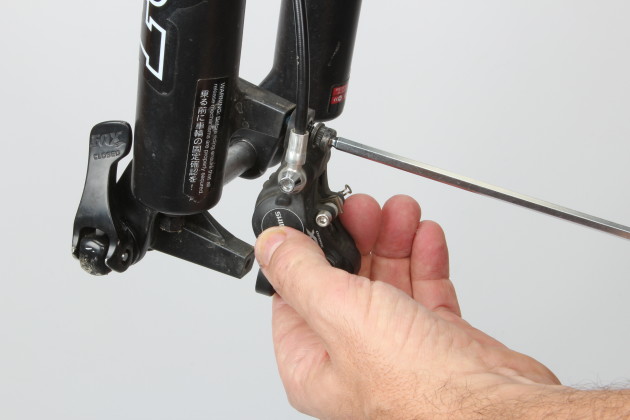
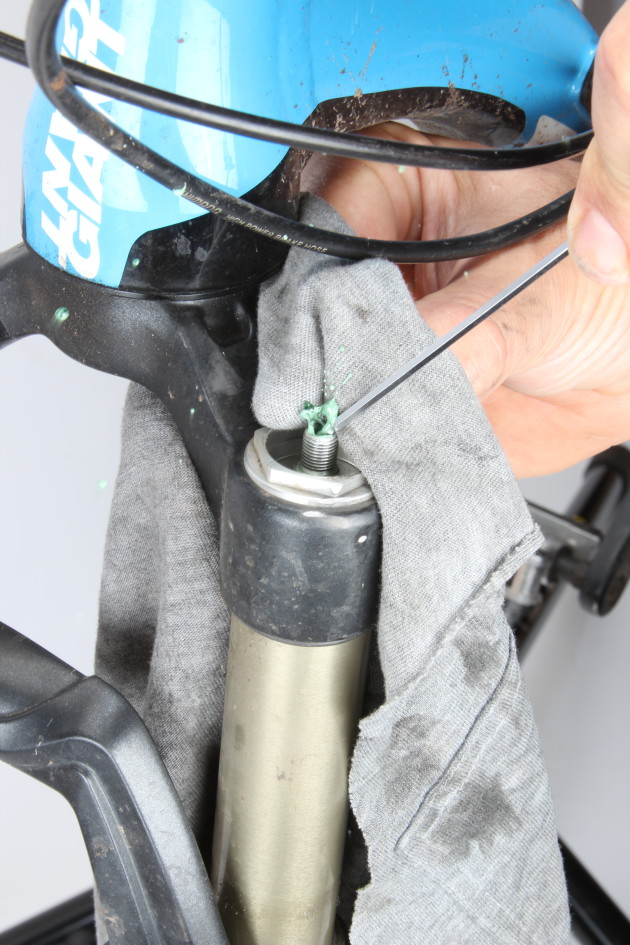
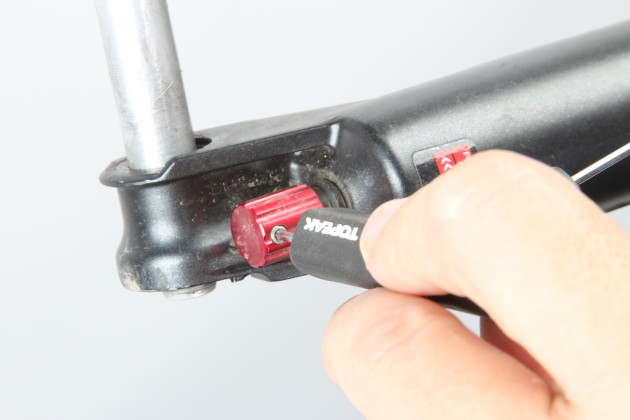
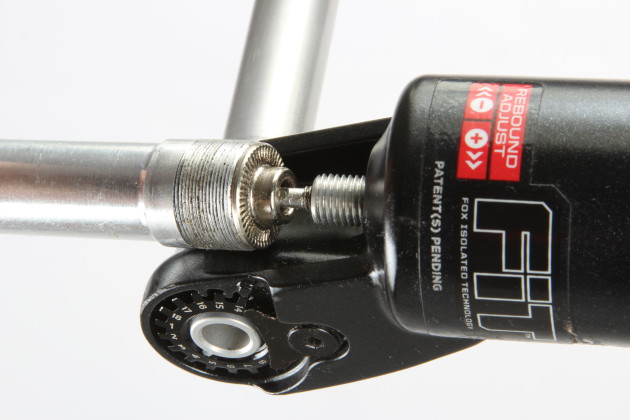
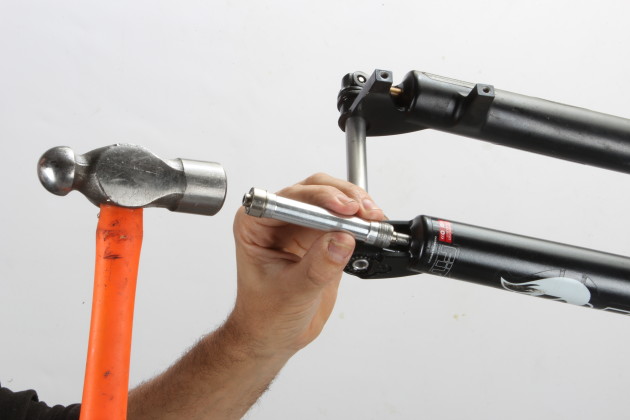
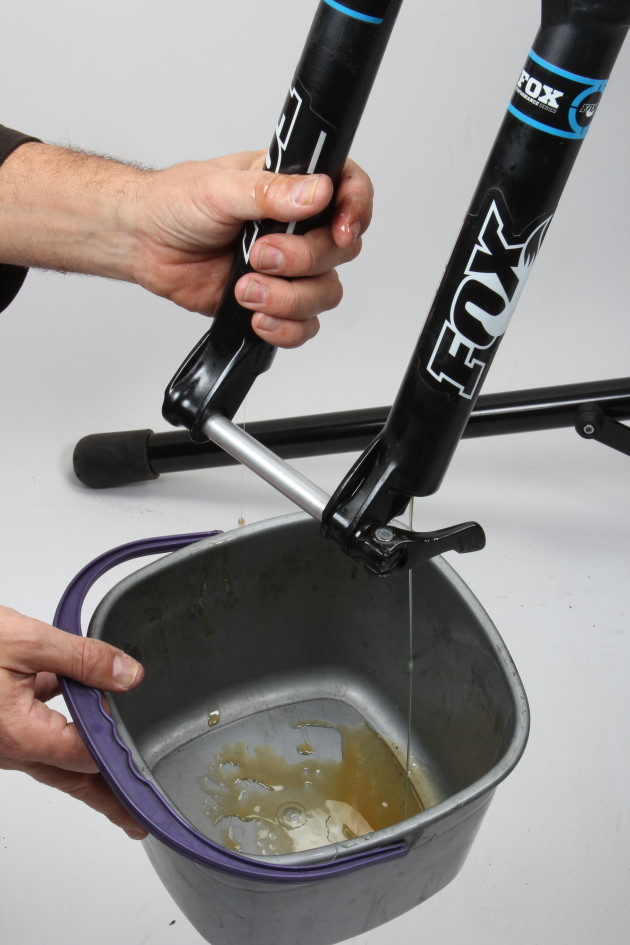
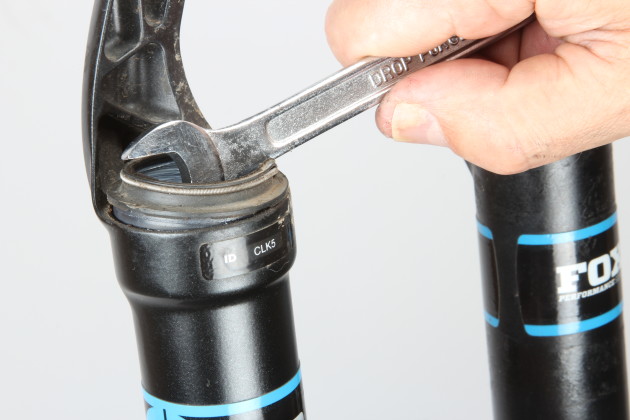
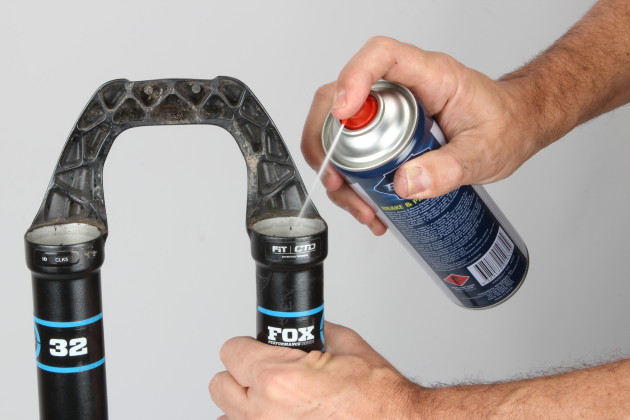
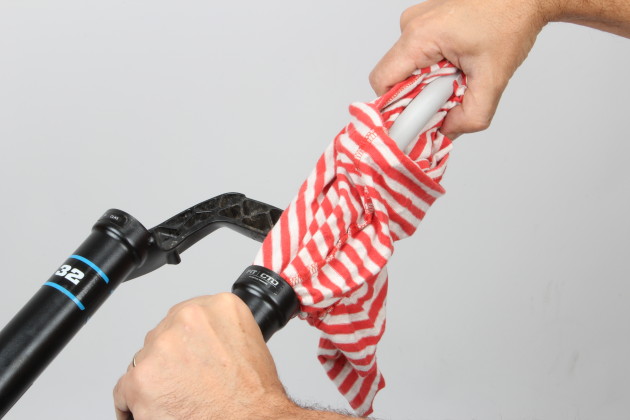
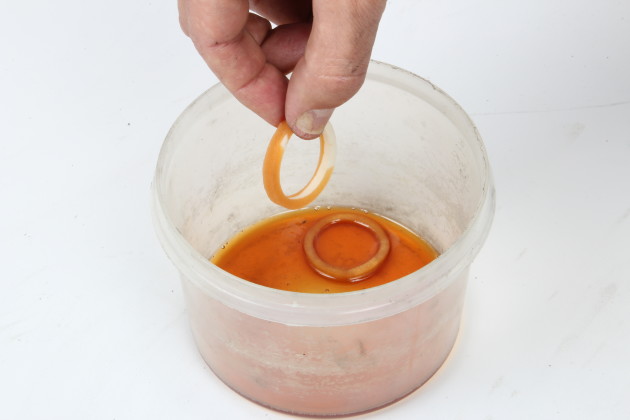
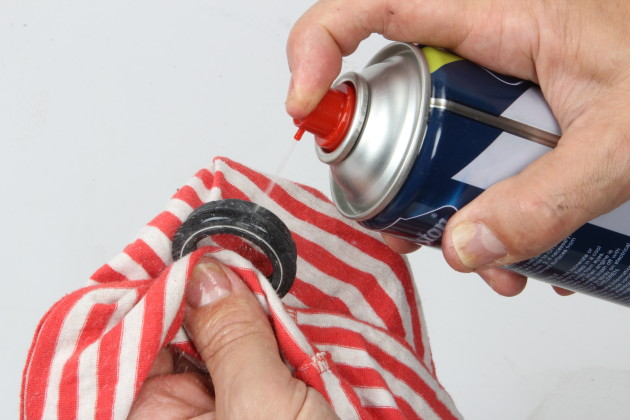
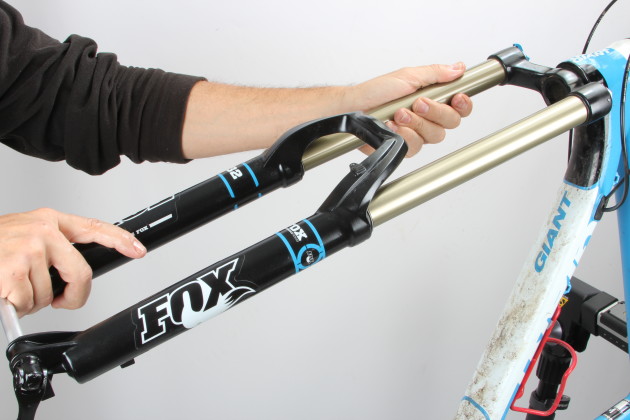
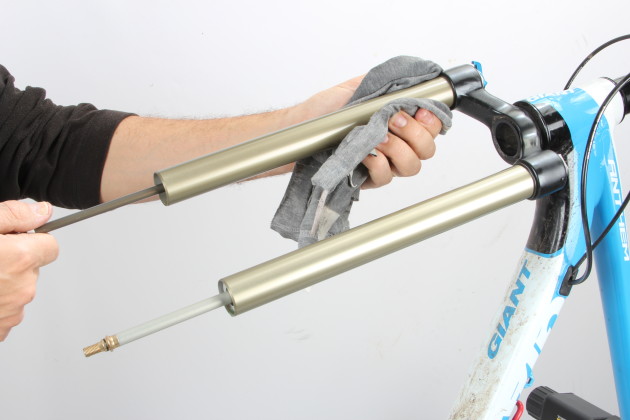
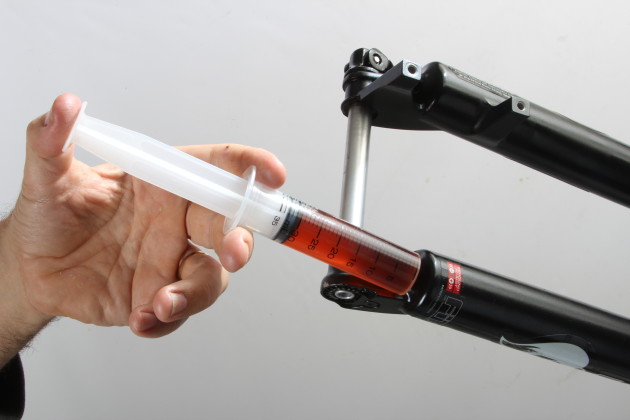
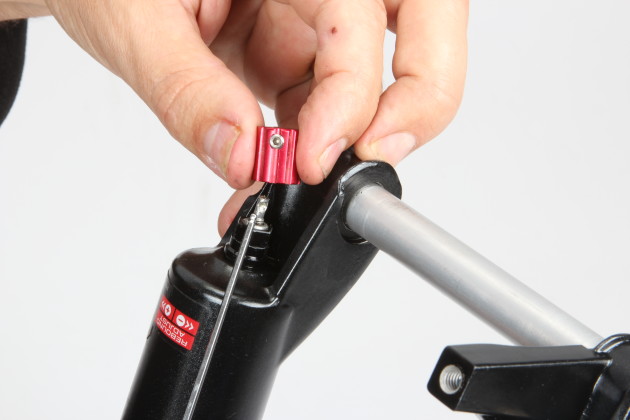
Start by removing your front wheel along with the brake calliper and hose. To avoid pad contamination, keep the brakes well away while you’re dealing with suspension fluids. A work stand will help if you’re leaving the fork on the bike but removing the fork completely makes life much easier.Whilst not essential, it’s best to let the air out for this procedure. Place a rag around the valve so you don’t get sprayed with oil (eye protection is a good idea too). Write down your air pressure settings beforehand as it will help when setting the fork up again.Turn the rebound dial to gain access to the grub screw. Undo the fitting with a 2mm fitting but don’t unwind it completely. Unwind it a few turns and the red knob will slip off.Use a 10mm socket to undo the nuts at the bottom of each leg. There’s a nylon crush washer underneath. In most cases it’ll come off with the nut but sometimes it’ll separate and you’ll need to help it along with your fingers.The threaded inner rods need to be knocked free from the lower legs. Use a soft alloy tube as a drift—don’t hit them directly as you’ll damage the threads. Ensure the drift is hollow so it slips over the protruding rebound adjuster. We used an old aluminium axle as it was just the right size. One or two taps with a hammer should free the inner rods. Have the fork horizontal or inverted at this point or the oil may pour out the bottom.Use a bucket or large plastic container to catch the old oil. Hold it underneath as you flip the fork over. Pull the lowers partway down and let the oil run out. Allow it to sit for a minute while the oil drains, then pull the lowers off completely.Place the open-ended side of a spanner under the wiper seal as pictured and lever it up. You’ll find a foam ring just under the main wiper seal; remove this as well as the seal kit includes a new one.Now you should be holding an empty lower leg assembly with nothing but the bushings inside. Spray alcohol or disc brake cleaner inside and use a bottle cleaning brush to scrub inside—this will help to dislodge any dirt or contaminants. Alcohol is better than degreaser as it won’t leave any residue.Wrap a clean rag around a piece of dowel or something similar. Run it down inside the fork to wipe the insides clean. Do this on both sides and repeat with another spray of cleaner if required.Soak the new foam rings in your suspension fork oil. While our 2013 fork originally used 10wt oil to lubricate the lowers, we’re replacing it with the current spec ‘20wt Gold’ oil to extend the service intervals. When doing this you’ll need to swap to the newer wiper seals as shown.Spray some alcohol around the outside of your new wiper seals and wipe them over. They typically have a waxy coating that helps them release from the mould. Removing this ensures they stay put once pressed into your fork.Use the seal driver to firmly push each wiper down into the lower leg. Keep them as straight as possible and drive them all the way home. It may be possible to substitute the Fox seal driver with a large socket or appropriately sized pipe but using the proper tool minimises the chance of damaging your brand new seal.Pop the oil soaked foam rings down into the fork and tuck them between the top bushing and the wiper seal. Then smear a layer of suspension grease on the inside of the wiper seal.Spray some alcohol on a rag and thoroughly clean the stanchions. Pull the threaded rods out as far as they will go and gently slip the lowers on. Take it slow and don’t force anything, as you don’t want to damage the brand new seals. Push the lowers up until you can see the threaded inner rods inside but they’re not protruding.Place the fork in a horizontal or inverted position. Measure out the correct oil volume as specified by the manufacturer and inject it into the leg with a syringe—in this case it was 30ml on both sides.Now slide the lowers all the way on so the threads pop out the bottom. Thread on the crush washer and the 10mm nut. It’s generally easier if you do the damper side (right) first. If the air piston gets pushed up inside you can place a few psi in the fork to push it back out. Torque the nuts as instructed by the manufacturer—they don’t need to be very tight (5Nm in this case).Locate the indent on the rebound adjuster and line it up with the grub screw that’s on the knob. Slip it in place and gently snug it up with a 2mm allen key. Now reset your air pressure and check the rebound adjustment before hitting the trail again.
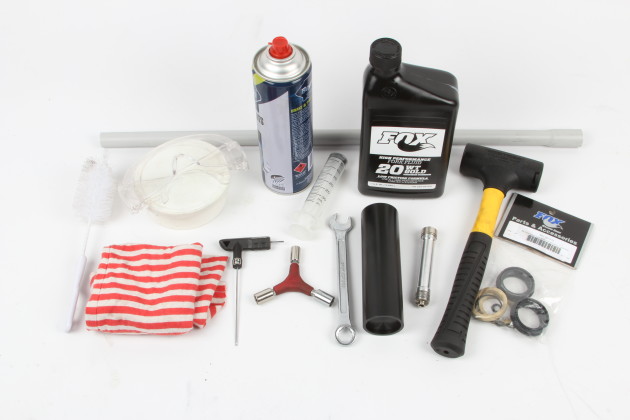
Tool Kit Here’s what we needed for our lower leg oil change: • Fox 32mm wiper seal kit ($59) • Fox 32 seal driver ($50) • Fox 20wt Gold oil ($36 for 946ml) • Suspension grease such as Slick Honey or Slickoleum • Alcohol or disc brake cleaner • Syringe • 10mm socket tool • Various allen keys • Large 15-19mm spanner • Hammer • Alloy drift • Piece of dowel, thin PVC pipe or equivalent • A bottle brush, clean rags
The 2022 Checkpoint legitimately feels like several bikes in one - all road, adventure, gravel and super commuter. The design, finish, attention to detail and subtleties all add up to make a fantastic looking and exceptional performing adventure machine.