
DIY Bottom Bracket Overhaul
External bearing bottom brackets have been around for a good number of years now and, for the most part, they have proven to be quite durable. I’m sure that most will agree that they are generally longer lasting than the internal bearing ISIS and Octalink bottom brackets that came before them.
 While that may be the case, bearings will always need some maintenance—especially in the potentially wet and muddy world of mountain biking. The only variable is how frequently the maintenance is required. Some fair weather bike riders may never need the knowledge that I’m about to impart, but those who ride lots, or live in a damp part of Oz could well find themselves with a bottom bracket that is in need of some attention.
As far as some manufacturers are concerned, when the bearing wears out, you just buy a complete new bottom bracket—just as you did with the ‘cartridge’ style bottom brackets of old. Many have the words ‘Do Not Disassemble’ marked clearly on them to stop you tinkering with them. This may sound like a money making scheme to some, but with most units costing around $70 it’s not so terrible. That said, it can add up if you are a frequent bearing killer and some people just like to repair what they’ve already got.
There is an alternative if you want to breathe new life into your existing bottom bracket. Modern external type bottom brackets rely on commonly available industrial bearings (get them from any bearing/ engineering shop). A pair of replacement bearings will cost around $30—less than half the cost of a new bottom bracket. The tricky part is removing the bearings from the alloy cups that they are pressed into.
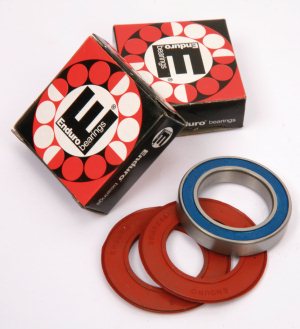
 Phil Wood, RaceFace and Enduro all make specialist tools that will remove the bearings from the cups. At the moment the Enduro tool is the most commonly available in Australia—it can be purchased from bike shops and www.diymtb.com.au for around $135. This tool will extract the old bearings and press the new ones in. The only thing it lacks is a tool for removing the nylon dust seal that covers the outer part of the bottom bracket. This isn’t really an oversight as it is made with aftermarket ‘Enduro Bearings’ in mind. Their bearings eliminate the pesky plastic covers that are fitted to most Shimano, FSA and Token bottom brackets. Each kit comes with easily removable rubber wiper seals to replace the fragile plastic items and the bearings feature a smaller inner diameter—this allows the inner race to sit directly on the spindle without the plastic cover/sleeve. The smaller inner diameter also makes room for slightly larger balls in the bearing race for better durability. Just make sure that the bottom bracket shell on your frame is accurately faced; the lack of plastic inserts makes the system less forgiving of misalignment.
 While purchasing a pro quality tool may be the best solution for some, you need to wear out a good number of bearings before you break even. Other options include getting a suitably equipped bike shop to fit the bearings (but their labour may negate any saving) or getting DIY MTB to do it (in most cases they will do it for the cost of the new bearings plus postage).
For those who want to do it themselves but don’t want to spend $135 on a specialist tool, there is another alternative. To begin with, you’ll need a few basic items; bench vice, suitably sized socket or equivalent, nail file/small flat screwdriver, Allen keys and bottom bracket cup tools. While it may be possible to knock the bearings out with a punch, a slide hammer and bearing collet will do a far better job. Available from most good bearing shops, the slide hammer should cost around $50 plus an extra $30 per bearing collet. A grand total of $80 makes it a fairly viable option for the home mechanic. With suitably sized collets the slide hammer will also remove bearings from BB30 and BB89 bottom brackets as well as other items like hubs and headsets.
Here’s how it’s done…

Start by removing your cranks. Some will have a built-in ‘self extracting’ bolt that pulls the crank arm off as you undo it, usually via an 8mm Allen key fitting (Truvativ, RaceFace and some FSA models). Others use a pinch bolt assembly with a cap that is used to preload the bearings on reassembly (Shimano and some newer FSA designs). If you are unsure, check the manufacturers instructions (usually found on their website) and, in the case of RaceFace cranks, look out for the bearing preload spacers and take note of their position. Once the removable arm is off, the spindle should slip out. A tap with a soft hammer may assist if it is a little stuck.
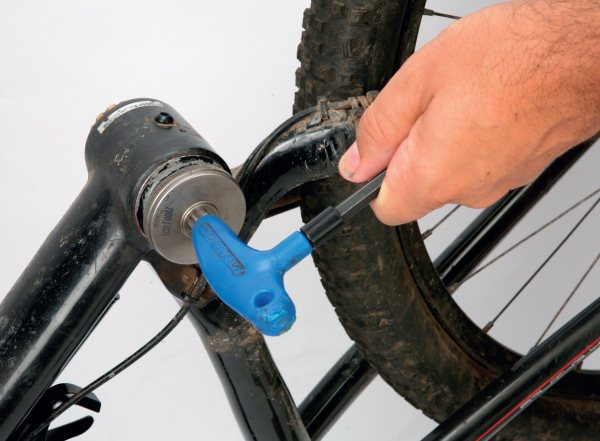
With the cranks out of the way, you need to remove the cups that house the bearings. While this can be done with the standard C-spanner style splined bottom bracket tool, circular socket style tools are better (pictured), as they fully engage all of the splines and are less likely to slip and damage the soft alloy cups. Don’t forget that the drive side cup (right hand side) is a reverse or left hand thread, so it is turned in a clockwise direction to remove it. These cups can be very tight so take care that you don’t slip and bash your knuckles!
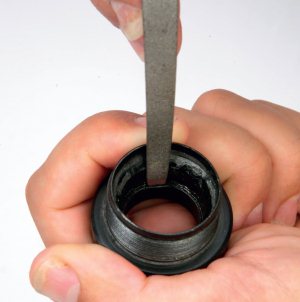
Most bottom brackets have a plastic cover that needs to be removed to access the bearing (common to Shimano, RaceFace, Token and others). Use a small flat screw driver or a metal nail file to push on the inner lip of the plastic cover. Also try levering it from the outside. These plastic parts are often brittle and fragile, so take care if you want to reuse them, as you can’t buy replacements. Don’t worry too much if you are fitting new Enduro bearings as they eliminate this finicky plastic part.
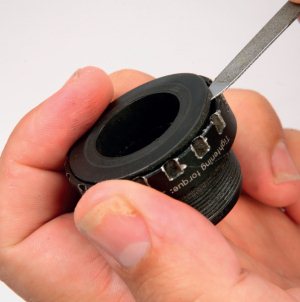
Now you should be looking straight at the bearing (Shimano units will have an extra seal that needs to be removed before you attempt to pull the bearing out). At this point you may also choose to regrease rather than replace the bearings if they still feel relatively smooth. Use a seal pick or a pointy implement to get under the outer edge of the rubber bearing seal. Gently pry it up without damaging or bending it. With the seal removed, you will be able to see the balls and can pump fresh grease in with a fine tipped grease gun.
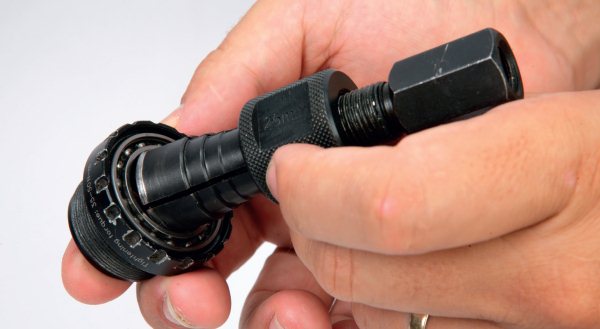
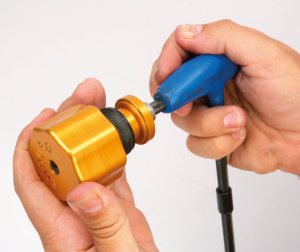
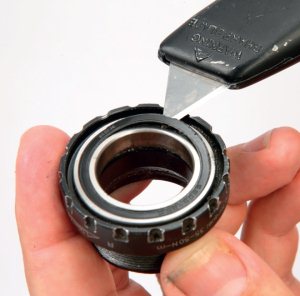
If you are going down the DIY bearing replacement route, you’ll need the appropriately sized collet fitting for the bearings that you want to remove. The common bearings with the plastic inserts measure 25mm on the inside of the bearing. Truvativ bottom brackets have a smaller 24mm inner diameter on the drive-side and a 22mm inner diameter on the left. Most aftermarket Enduro Bearing kits have a 24mm inner diameter that sits directly on the bottom bracket spindle. You may find that you’ll need a 25-29mm collet to remove the standard bearings and a 20-24mm collet if you also want to remove the Enduro type bearings. At $30 a pop they are not a huge outlay, but it is worth noting that you may need more than one collet in the long run.
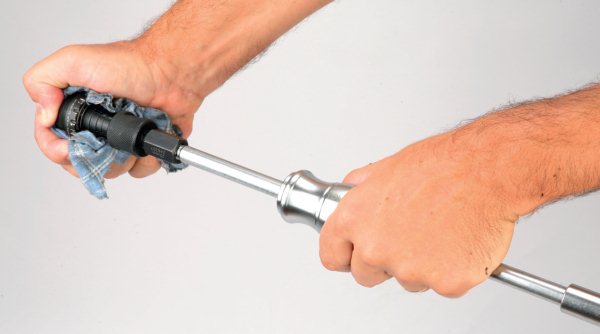
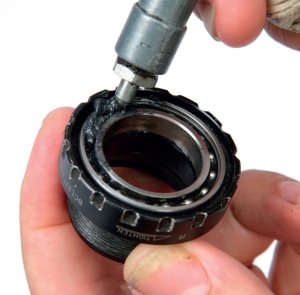
Once the collet is locked in place, thread the slide hammer on. Grip the bottom bracket cup with a soft rag and use the hammer action to knock the bearing out—the jarring of the slide hammer makes this task surprisingly easy. Shimano bottom brackets seem to be the tightest and toughest when it comes to bearing removal but we haven’t come across one that hasn’t come apart with half a dozen good hits. If you are having trouble holding the cup, you could also thread it into your frame, but you probably wouldn’t want to do this on a particularly light or fragile bike—just to be safe.
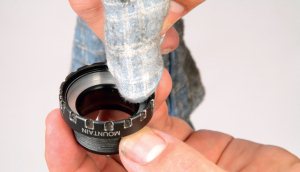
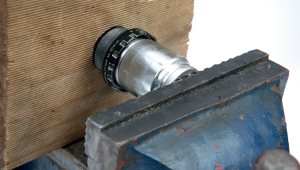
With the old bearing out, it is now a simple case of cleaning and inspecting the cups before inserting the replacement bearings. Give it a wipe and a clean, then smear a bit of grease inside the cup to ease the reassembly process. Use a socket combined with a bench vice and a chunk of wood to press the bearing home (the wood will protect the alloy thread from damage). The socket needs to be a fraction smaller in outer diameter of the bearing but big enough that it presses on the outer bearing race, not on the seal or the inner race—something a little less than 37mm should do the trick. The hardest part will be getting the bearing to go in straight to begin with. Tap it in gently with a rubber hammer to begin with until it is lined up evenly, then place it in your vice and press it home.
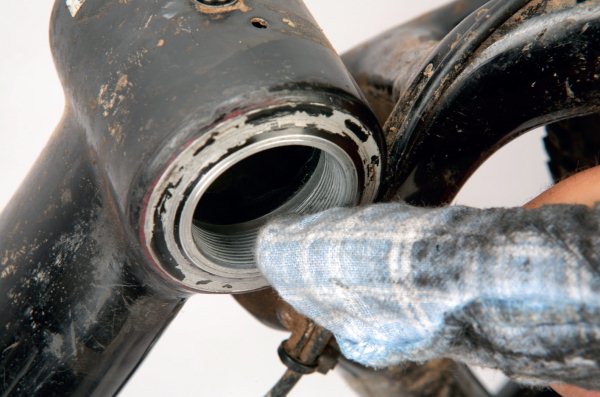
Before reinstalling, give the threads on your frame a good clean and grease them well. This will ensure that the cups go in smoothly, and will help you get them nice and tight—most recommend between 35-50nm of torque, which is very tight. Too loose and you may wind up with an annoying clunk or a creak in your bottom bracket that becomes apparent under high pedalling loads. Pay close attention to ensure that any spacers are placed in the correct position when refitting your bottom bracket cups.
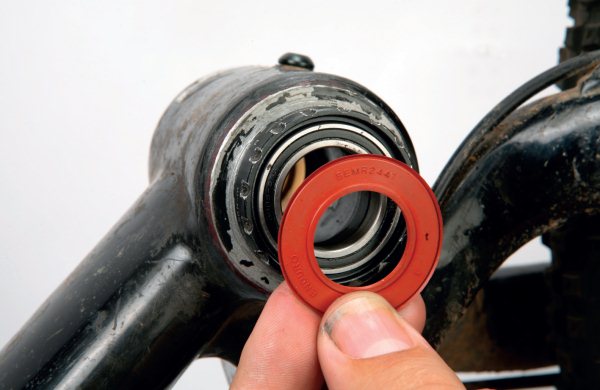
If you are using the aftermarket Enduro Bearings, simply place the new wiper seals over the bearings (as pictured) and reinstall the cranks. Truvativ use a similar wiper seal system which also makes this part of the job a breeze. Great care needs to be taken if you are trying to reuse the plastic dust covers that many bottom brackets rely on—don’t force them or the brittle plastic may break. Check that the cranks are tightened according to the manufacturers’ recommendations and ensure that they spin freely (i.e. there shouldn’t be too much preload restricting the movement of the bearings)— now go and ride! Always recheck the bearing preload and crank tightness after a ride or two to ensure that everything is functioning as it should—some cranks have a nasty habit of working loose after a few rides.


