
Shock Setup 101
 To get the most out of your suspension it needs to be set up correctly, and the first step in setting any suspension system is getting the correct amount of sag—here’s how it’s done.
When you sit on your bike, the suspension should sink a little into its travel; this is sag. Suspension lets the wheel move up and over bumps, absorbing the impacts as you go—that’s pretty obvious. Complementing this, sag allows the wheel to fall away from you and follow the ground wherever there’s a depression in the trail surface. It helps your tyres maintain some downward pressure, which improves traction and smooths out the trail—it’s an important part of the whole suspension package.
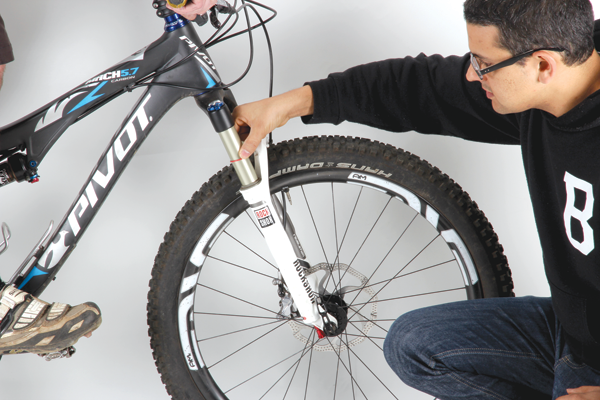
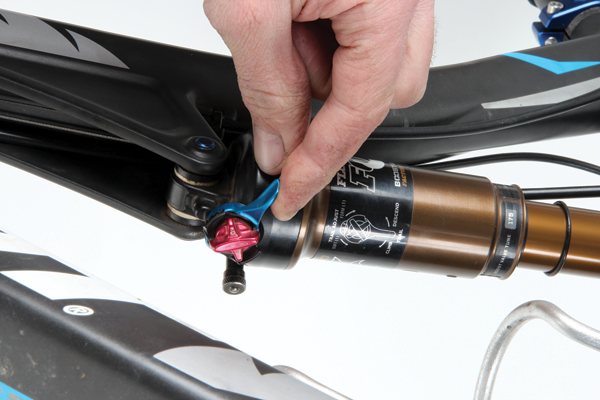
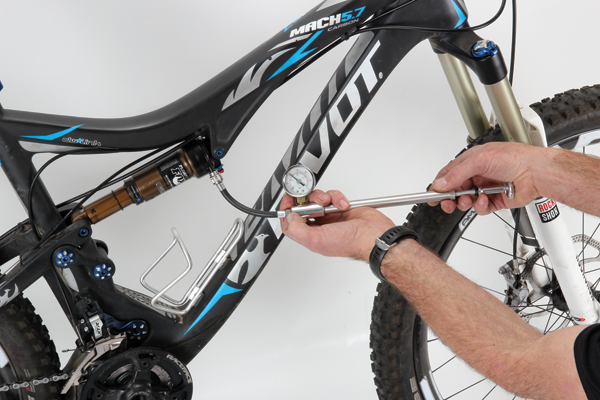
The amount that your bike sags is influenced by the firmness of the spring. Aside from downhill bikes and some cheaper MTBs, most cross-country, trail and all-mountain bikes rely on air springs. As a result it’s relatively easy to fine-tune the amount of sag on your bike. All you’ll need is a shock pump, a ruler/tape measure or verniers and perhaps a small cable tie. It can also help to have a friend to assist but this is not essential. Many shocks and forks will have an O-ring around the shaft/stanchion that will help you measure the sag. If your bike doesn’t, wrap a cable tie around the fork/shock and pull it gently snug (don’t make it tight as it could scratch the shaft).
While just about every suspension system needs to have some sag, the amount will vary depending on a range of factors. Sag is usually expressed as a percentage of the total travel. In most cases you’ll want between 20% and 30% of the total available travel to be used as sag. Some rear suspension systems are designed to run a specific amount of sag, so check the recommended settings on your bike before you begin to tinker. Beyond this, a lot will come down to personal preference—there are no real rights and wrongs. You may choose to start with 25% as a base point and tune from there once you’ve tested it on your local trails.
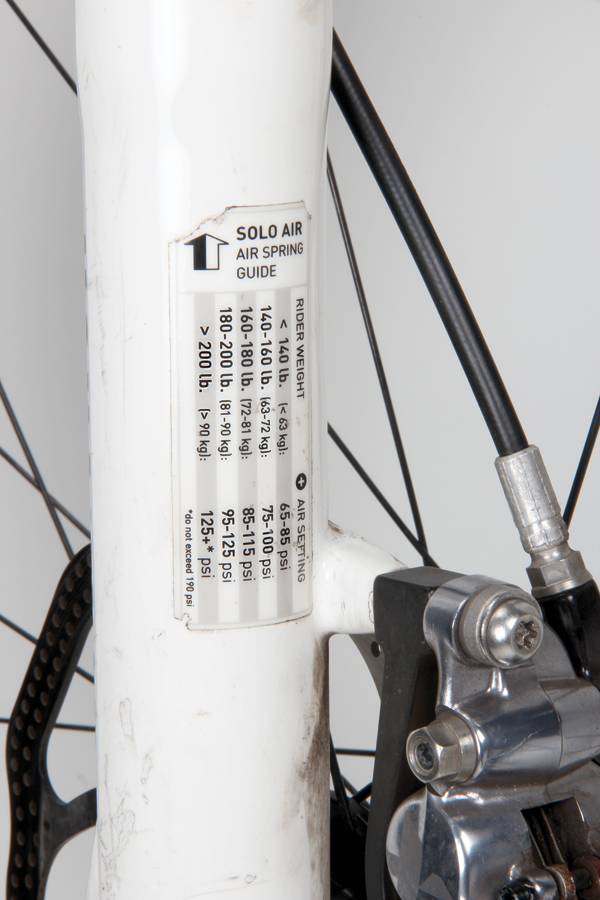
It’s worth noting that many manufacturers offer air pressure guides based on your body weight. These tend to be a little hit-and-miss as pressure gauges can vary wildly in their accuracy and differing body positions will also influence the outcome—measuring the sag is the more accurate way to go.
Back to School
To calculate your sag percentage you’ll need to use this very simple formula:
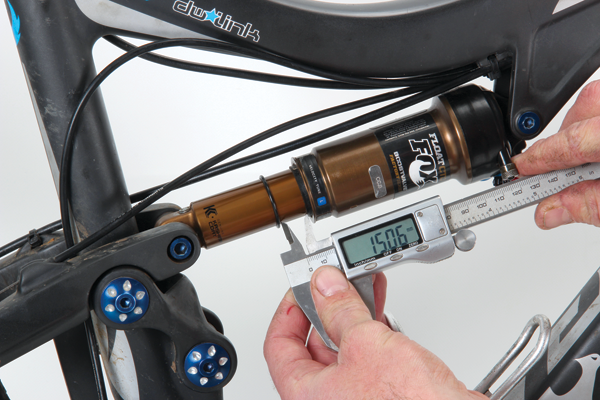
Sag in Millimetres ÷ Total Available Shock Stroke × 100 = Your Sag as a Percentage
So if you measure 25mm of sag on your 120mm travel fork, the figures would look like this:
25mm ÷ 120 × 100 = 21% sag — simple!
With the rear suspension you’ll be dealing with the shock sag and the total available stroke, not the actual travel at the rear wheel. The rear shock on a 120mm dually may have a 50mm stroke, so the figures could look like this:
12mm of sag ÷ 50mm available shock stroke × 100 = 24% sag.
If you’re unsure of how much travel your fork or shock has, refer to the specifications for your particular bike. If the specifications are unclear, let all the air out of your shock and compress it completely—sit on the bike with no air in it if you like. Make sure the suspension is fully bottomed and the O-ring/cable tie is pushed up against the shock seal. Now reinflate the air spring and measure from the top of the wiper seal to the O-ring. This measurement will be your total available stroke.
If your suspension offers suggested air pressure settings, use that as a guide to start with. As mentioned earlier, the amount of sag is directly related to the firmness of the spring (air pressure), it’s not related to the damper settings. When measuring your sag, it’s best to set any compression adjustments to the softest setting. Disengage the platform damping and switch off any lockouts. Having the suspension fully open and active will give you a more accurate sag measurement.
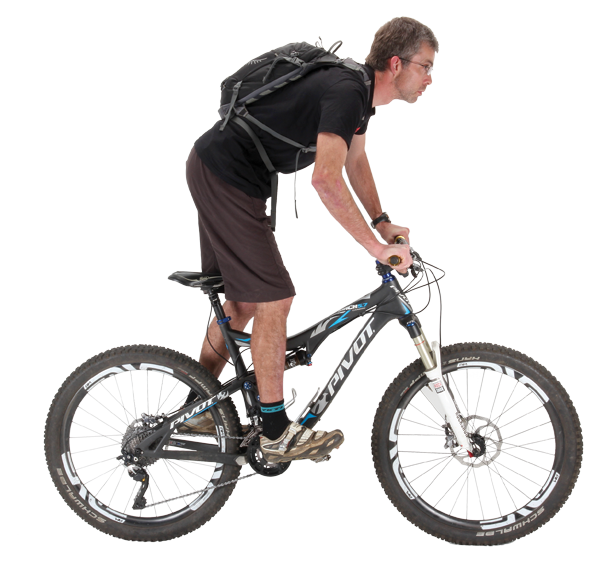
Get kitted up in the gear that you’d usually ride in. If you typically wear a two-litre hydration pack, then fill it with water and put it on. Now park yourself next to a wall; make it so you can steady yourself with your handlebar or elbow without fully leaning against the wall. As an alternative, get a friend to hold the bike upright while you hop aboard. With the suspension fully open, the bike should sink into its travel—there’s no need to bounce around on the bike.
Move Your Body
It’s important to note that your body position will greatly influence the results. Stay seated and you’ll get more sag on the rear suspension and less up front. Stand and centre your bodyweight and the fork will sink further while the rear will show less sag.
Adjust the sag to suit your riding style. If you want to optimise the bike for cross-country, set your rear suspension whilst seated. If you’re a relaxed and seated XC pedaller, also set the fork sag whilst seated. More aggressive riders may choose to set the front suspension whilst standing; that way it won’t be as soft and bob-prone when you are cranking out of the saddle. Technical descents are tackled whilst standing; if that’s where you want to excel it’s logical that the measurement should be taken when standing with your arms bent and weight centred.
So, assume your preferred position and let the suspension settle into its travel. Without shifting your bodyweight, reach down and push the O-ring/cable tie down to the shock seal. This isn’t always easy, so you may wish to call upon your helper. Now put your foot down and hop off the bike without bouncing on the suspension. Measure between the top of the wiper seal and the O-ring. Run the numbers through the aforementioned formula and you’ll get the sag percentage figure.
If you’re aiming to run 25% sag and you only have 15%, you’ll need to lower the air pressure. If you come up with 35% sag then you need to add some air. Bear in mind that mounting the shock pump will allow a small amount of air to escape into the hose and reduce the shock pressure. Simply mounting the pump can drop the rear shock pressure by around 10psi. You’ll hear air escape as the pump is removed but this is from the hose, not the shock—the pressure shown on the gauge should be correct.
Custom Tune
So what is the magic sag number? Between 20-30% may be considered normal but there’s a host of other things that you’ll want to look at once you hit the trail. If you never come close to using all of your suspension travel, even on the biggest hits and landings, then you may wish to run more sag (a softer shock setting). If you find the fork sinks too far into its travel on steep descents, consider running less sag up front. A bike that’s set up for descending generally needs sag on the rear; maybe 20% for the fork and as much as 35-40% on the rear—once pointed down a steep grade the sag will balance out. There’s all manner of variables that may lead you to tweak the air pressure settings. The main thing is to be aware of your sag settings and write them down once you’ve got it dialled. Knowing your optimal sag setting is much better than relying on a shock pump reading. Different pumps can give you readings that are 20psi apart for the same actual air pressure—sag on the other hand is a fixed and reliable value.
Most modern MTB shocks offer a wide range of tuning options; rebound, platform damping, low speed compression, lockouts and so on. Get your sag sorted before you worry about any of these other settings and you’ll be 80% there with your suspension setup. So take your time, acquaint yourself with a shock pump and get the most out of your suspension!
Sag Setup Basics
- Between 20% and 30% of your travel should be used as sag
- Sit on the bike and let it settle under your weight
- Generally you’ll measure the rear sag whilst seated and the front whilst standing
- Push the O-ring up against the shock seal
- Dismount and measure the gap between the seal and the O-ring
- Calculate the sag
- Increase the shock pressure to reduce the sag or let air out to increase the sag
- Hit the trail and fine-tune further as required


